Tag Archives: Jolly

Jolly Software Upgrades Announced

Jolly has announced an updated version of their software ID Flow, Lobby Track, Label Flow and Asset Track to version 5.03. There are many highlights and features of this new version that will provide premium features that will enhance user experience. Updated features include:

Features Added:
– Support for S2 Access Control System
– Support for DSX Access Control System
– Support for Topaz optical fingerprint scanners
– Link Lobby Track user accounts to Active Directory user accounts
– Improved Oracle support
– Populate record forms by scanning the 2D barcode or magnetic stripe on a North American driver’s license or ID card

Enhancements:
– Configure multiple Active Directory searches for Host Lookup
– Improved support for non-western languages and fonts including Arabic, Cyrillic, Greek, Hebrew and Turkish
– Improved the automatic image reduction feature to support bitmap images
– Enhancement of Topaz signature cropping
– Improved image path support for certain TIF and JPEG images
– Display a results summary after record import
– Support for a 15 digit UID default value
– Attendance log fix for PCs configured to use a comma character instead of a decimal point

The Jolly software upgrade, including ID Flow version 5.03, is available to all supported customers at no additional charge. Customers with earlier releases should contact one of our ID card experts for upgrade details. Assistance with this and other ID card software products is available toll free at 888-485-4696.

ID Flow Software – Adding Bar Codes and Magnetic Stripes

Adding Bar Codes and Magnetic Stripes through the ID Flow Software

ID Flow Software provides the capabilities of adding bar codes and encoding magnetic stripes on custom printed identification cards. The following video demonstrates 1D and 2D bar coding as well as how to encode a magentic stripe through the card software.

The above video describes how to insert and format barcodes and magnetic stripes:

1D Barcodes
1. Click on the 1D barcode tool.
2. Draw the bar code area on the card surface displayed on the monitor with your mouse.
3. The properties interface will automatically open allowing you to add data, select your bar code type, select readable text and select specific reader specifications.

2D Barcodes
1. Click on the 2D barcode tool.
2. Place and size the bar code area on the card surface with your mouse.
3. The properties interface will open allowing you to add data, select the bar code type, select readable text and select specific reader specifications.

Encoding magnetic stripes
1. Click on the magnetic stripe.
2. Enable the tracks needed and add data to each.
3. View the backside of the card to see a rendering.
4. Use a printer with a magnetic stripe encoding module and cards with a mag stripe to encode the cards

Additional ID Flow Training Videos:
ID Flow Software- Text Formatting
ID Flow Software – Working with Records
ID Flow Software- Working with Images

For additional information about ID Flow or other ID card software products, contact our software experts at 888-485-4696.

ID Flow Software – Text Formatting

Learn how to format text when designing a custom ID card with ID Flow software.

FOR STATIC TEXT

1. Click on the T icon.
2. With your mouse, draw an approximate text box and type in text in the white area.
3. Highlight the text to format.
4. You may click on the color box to change the text color and then click ok.
5. If you click on the properties tab, you may select a desired style.
6. Use the adjustment tools to center the text.

FOR TEXT FROM THE DATABASE

1. Click on the T icon.
2. Draw a text box on the card layout.
3. In the text dialogue, click the plus field, select database field and then select the fields desired.
4. Alignment tools are provided in the text dialogue box.
5. On the properties tab, uncheck the word wrap and then click ok. The placeholders now appear in the template.
6. Adjust the size of the text box to clean up the template.
7. Click the live data checkbox to see your design using a record from the database (to edit, double click the text box & adjust as needed).

This video also demonstrates how to combine static and variable text. The orientation of the text can also be changed as demonstrated in the video.

For additional information about ID Flow or other ID card software products, contact our software experts at 888-485-4696.

ID Flow Software – Working with Records

Learn about Working with Records in ID Flow Software

The video above walks step by step through a number of different database, record and picture adjustments that can be made with ID Flow software. This five plus minute video is packed with some of the following information:

Change field order and field properties (.15)
Fields can be moved with a mouse (.29)
How to change placement of the caption (.36)
How to change filed width (.45)
How to format text (1.04)
How to create drop down lists (1.20)
Photo information (1.43)
Advanced searches and sorting (3.17)
Create and clear filters (3.30)
Spreadsheet viewing (3.56)
Import/Export information (4.14)

For additional information about ID Flow or other ID card software products, contact our software experts at 888-485-4696.

How To Network Jolly Products

Instructions to network Jolly software products are as follows:

Moving the Company Source (the central networking file) to a network server

1. Load the software on a workstation
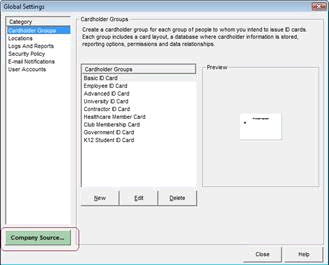
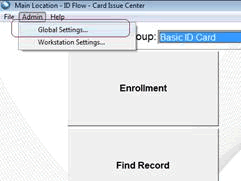
2. In ID Flow Card Issue Center, click Global Settings

network iinformation

3. Click on Company Source

network iinformation

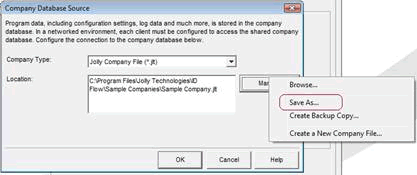
4. Click “Manage” then “Save As” and save the company file to a Server Location

network iinformation

5. To network a second workstation, go through the same steps and at the final step, select “Browse” instead of “Save As” and browse to the Company.jlt file that you moved in the previous step. The software is now networked.

Moving Cardholder Databases to a Network Server

1. By default the sample company database is stored on:
C:/program files/jolly technologies/id flow/sample databases/sample database.mdb

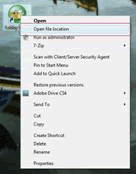
In Windows 7 and Vista the shortcut to get there is to right click on the ID Flow or Lobby Track Icon and select “Open File Location” in Windows XP, right click on the Icon, go to properties, the click file location:

network iinformation

2. Copy the “sample company.mdb” and paste it to the network server location

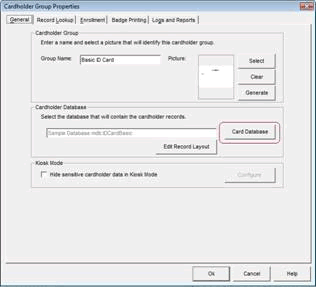
3. Click the “Properties” button to get to the Cardholder Group Properties dialog
(this is a shortcut, you can also get there by clicking edit on the highlighted cardholder group in Global Settings)

network iinformation

4. Click on the “Card Database” button

network iinformation

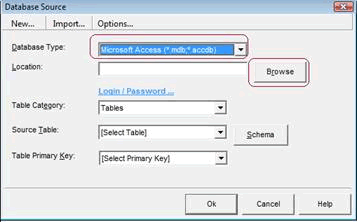
5. Change the database type to Microsoft Access and then browse to the .mdb file you placed on the server

network iinformation

6. On the same dialog above, you will need to select the source table for the cardholder group and then select ID Number for the primary key.

7. If there are more than one cardholder groups the customer is using, repeat steps 1-6 in this section for each cardholder group.

For more Information about ID Flow and Lobby Track, contact our software experts at 888-485-4696.

Lobby Track Visitor Management Screen Shots

Lobby Track 4 is premier software for visitor and member management. The software registers visitors and members. The software will issue permanent and temporary badges as well as track time and attendance. The software can be used to monitor many activites throughout the organization.

Following are screen shots from the software:

Main Menu

Lobby Track

Visitor Check In

Lobby Track

Successful Visitor Check In

Lobby Track

Record Center

Lobby Track

Charts in the Record Center

Lobby Track

ID Flow Four Badge Designer

Lobby Track

For brochures and specific information about Lobby Track or ID Flow software, contact our id card experts at 888-485-4696.