Evolis Tattoo2 – Firmware Update Available

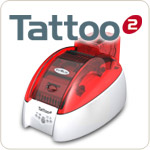
The Evolis Tattoo 2 printer provides a colorful plastic card print. The firmware for this printer has been recently improved to provide significant improvements in the print quality results.

To download the recent firmware, visit the drivers and firmware page on the Evolis website at: https://www.evolis.com/eng/Drivers-Support/Product-support/Tattoo-2/Drivers-and-firmware

If you are interested in information about the Evolis Tattoo 2 printer or other Evolis printers available, contact our ID card experts at 888-485-4696.

Evolis Dualys – Warning Light is Blinking

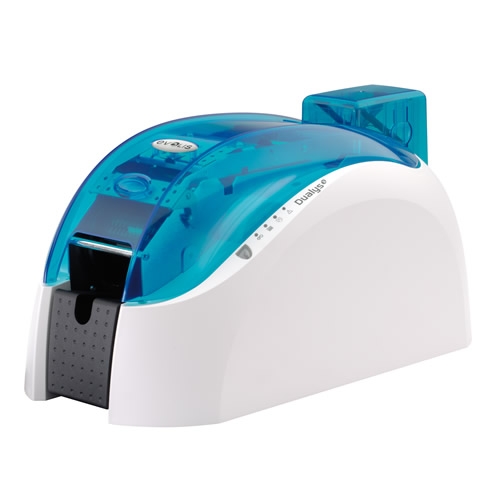
Evolis Dualys
If your Evolis Dualys printer will not print, you may notice that there is a warning light on. The light appears to be an orange or yellow triangle that is lit up.

When this light is on, the first thing to do is to check and make sure that the exit hopper is pushed all the way down and is in place.

When the hopper is placed correctly in the printer, the warning light should turn off. The printer should also resume printing.

For additional information about the Evolis Dualys ID card printer, contact our ID card experts toll free at 888-485-4696,

How an HID Prox Card Works

ISOPROX

A proximity card by HID is capable of storing embedded information inside. The information stored can be extracted and transmitted to a control system for processing. If the information transmitted lines up with the data stored in the control system, the system will provide an appropriate action, such as unlocking a door for a card holder.

The HID prox card, sized the same as your credit card, is part of a system that includes the cards, a card reader or readers, computer and an access control panel. Together, these components work together to act as a security officer in an organization to approve access to secure facilities or networks. Detailed, accurate reporting occurs with this system as the electronic devices log each transaction.

HID cards work as they carry an embedded binary code unique to the card holder. The code is referenced to the card holder in the database in the access system and is a specific sequence number that can be extracted by a card reader when swiped or held near the card reader.

The card reader connected to the access control system relays the sequencing for review when the card is held near. The control panel accepts the information and reviews it in a specific order to determine access eligibility. The data string is first reviewed for length. If that is correct, the binary code formatting is reviewed to determine if it can be recognized. With positive results, the system advances to review the facility code and the site code for positive matching results. If the card number is then confirmed in the database without restrictions on current time or location, the card holder is approved for access. The controller provides authorization to unlock the mechanisms restricting the door or network from opening.

The security personnel in charge of the software application have authorization to enter the database and update card holder information. Authorized people can configure the door access hardware to open and they can approve of the HID prox card entry at specific times. Reports for all activities can be generated as needed for management review.

Want to learn more about HID access cards and systems? Check out these links from our blog:

Using an HID card as an Identification Card

Tips for Printing on Your HID Card

Components of an Access System

Best Practices with HID Cards

Dye Sublimation Printing vs. Thermal Transfer Printing

Plastic ID card printers use two types of printing.  Thermal transfer printing and dye sublimation printing are used in both direct to card printers and retransfer printers.  Direct to card printers merge the image directly on the surface of the card.  Retransfer printing deposits the image on the back of a clear plastic film.  This film is then bonded to the surface of a plastic card.  Retransfer printing is the newest of these printing types and results in a better image result.  The card design is applied to specialized cards and does not require a perfectly smooth card as the direct to card printers require.

Thermal Transfer Printing

Thermal printing is when resin or ink is melted off of a printer ribbon and is directly transferred to the retransfer film or the surface of the card.  To melt the ink, a print head is used.  The print head has heated pins that are aligned across a ceramic plate.  In the correct sequence, the pins in the print head receive instructions to heat and release ink at just the right moment. The desired digital image created in the software is recreated on the card or ribbon.

Colored prints require the use of Y, M and C panels.  As each panel passes over the card, dots of color are released resulting in the completed image.  The K panel produces needed black printing on the card.  Dithering allows the dots of different colors to be placed close together to create a blended shade when observed.

Monochrome printing is also available.  This single color ribbon produces clear results with standard text and with bar codes.  Monochrome printing is completed at high speeds and is often used to customize a preprinted card.  The thermal ribbons provide durable print that resists fading. The resin dries quickly.

Dye Sublimation

Sublimation is when a solid is heated directly into a gaseous state.  The solid bypasses the liquid state during heating.  With this printing, the dye is heated to about 250 degrees Fahrenheit while the polymers in the PVC card are heated to 350 degrees.  The gaseous dye penetrates the plastic and as the card cools, the dye chemically bonds with the plastic card.

Crisp, sharp images are printed with dye sublimation printing.  Photographic images are printed with accuracy.  The higher heat levels allow more dye to be released into the card surface.  The result is the colors blend into a pleasing result as there is control over the opacity and transparency of the printing result.

Colors in this printing method are applied one panel at a time- the Y, M and C.  This type of print is prone to fading when exposed to UV rays from the sun.  Often a UV resistant topcoat is recommended to help protect the dye printed cards.

Zebra P330i – Clearing a Card Printer Jam

To Clean a Card Printer Jam in a Zebra P330i, please follow these instructions:
1.  Push the card thickness guage to the uppermost position.  This guage is located on the left side of the card feeder.  This will decrease the tension on the card and allow you to easily pull it out.  Remember to reset the guage back to its original position before continuing to print cards.
2.  To eject the card, open the printer properties menu.  Select the device settings tab and then select the tools menu. There are two card eject buttons.  One ejects the card from the card engine.  The other one ejects the card from the feeder and the print engine.
3.  Turn the printer off and then on again.  The card will automatically eject when the printer is turned back on.


Find out specific information about Zebra Printer models:

Zebra P110i
Zebra P120i
Zebra P330i
Zebra P430i

eMedia Software – Getting Out of Demo Mode

If you are still using an Evolis Pebble4 or Evolis Dualys3 card-printer with eMedia Card Designer software, you may need to follow this procedure for getting out of demo mode.

When the Pebble4 and Dualys3 printers were still in production, Evolis included a copy of eMedia Card Designer – Standard Edition. It did not require a license key for use. At installation, Card Designer is first set up as a 30-day working trial of the Professional Edition. After 30-days, a message appears indicating the need to enter a valid license key. From that point, the program operates only in “Demo” mode.

What is NOT clear is that you can continue using the program for free in Standard Edition mode. Getting out of demo mode, and back to the free Standard level is a quick process, accomplished in just a few steps. (Note – this is only effective if using an Evolis Pebble or Evolis Dualys printer.)

Getting out of Demo Mode:

1. Ensure that you are in Design mode, then click on the “DEMO” icon on the tool-bar.

eMedia card designer toolbar

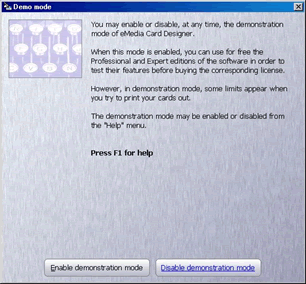
2. When you see the screen below, click on the “Disable demonstration mode” button.
getting out of demo mode

3. Switch to operating mode.

eMedia card designer operating mode
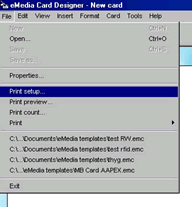
4. Click on “File”, then click on “Print Setup”.
eMedia card designer print setup

5. Select Evolis Pebble or Evolis Dualys. It is important to not rename the printer driver from their default values – eMedia Card Designer depends on proper naming to ensure the program will operate in Standard Edition mode without requiring a license key.
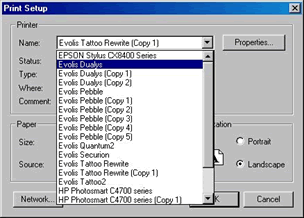
eMedia card designer select a printer

Expected Results:

If you have followed the above procedure correctly, you will now be able to print normally, and without receiving the error message indicating an expired license.

Additional Information:

Both the Evolis Pebble4 and Evolis Dualys3 went out of production by Evolis in 2012. Support and supplies remain available, but the printers cannot be purchased as new any longer. As to the software, eMedia no longer distributes or supports the Card Designer version of their product, having replaced in with eMedia CS. In 2016, eMedia CS was replaced by eMedia CS2.

For eMedia software clients using printers other than the Evolis Pebble4 and Evolis Dualys3, we recommend the latest version of their software – eMedia CS2. It is available for 15-day free trial directly from the eMedia CS2 download page, or for purchase in the Safe-Card ID web-store.

Of course, if you should have on-going problems or further questions, our ID-card experts are always ready to help. Just call us toll-free at +1 888.485.4696 (from the US or Canada) or +1 704.535.5200 (from other locales).
Evolis Dualys Warning Light Stays On

Evolis Dualys

If your Evolis Dualys caution light is staying on and the printer will not print, here is what you should do.

1. Check that the printer is plugged in correctly and the power button is lit up.
2. Check to make sure that the exit hopper tray is pulled all the way out and snapped into the correct place.
3. Unplug the power source and wait 10 seconds.
4. Plug the printer back into the power and check to see if the warning light has gone off.

The steps above should allow your Evolis Dualys to begin printing again.

Zebra P330i – Routine Printer Cleaning Recommendations


Printer Cleaning Instructions:

Clean the printer after 1000 color prints or 5000 monochrome prints. The LCD will display “clean printer” to remind you of this. For best results, clean the printer as soon as possible after this message displays.

1. Leave the printer on and press the button. Hold the button for 3 seconds. The LCD will display “remove ribbon and close head.”
2. Open the printer lid and push the blue release arrow forward. Lift up the printhead carriage..
3. Remove the ribbon spools.
4. Close the head carriage. The LCD with display “empty feeder and press button.”
5. Open the feeder lid and remove all cards but the bottom card. This card will remain in the feeder until you press the eject button.
6. Load the cleaning card in the feader. Place the small cleaning card in the card feeder. The belt will move it in halfway and continue to clean other parts of the printer. The small card will be ejected when it has finished cleaning.
7. The LCD will display “press button to continue.” Feed the long cleaning card into the card feeder exit slot. It will move back and forth as it cleans. The LCD will display “cleaning printer.”
8. When completed, the LCD screen will display “ready.” You may return the ribbon spools, reload cards and resume printing.

If you notice spots or streaks, you may need to clean the printhead.

1. Turn the printer off.
2. Lift the carriage and remove the print ribbon.
3. Sqeeze the plastic cleaning swab stick to move the liquid into the tip.
4. Move the moistened swab side to side across the elements. Wait 2 minutes.
5. Turn the printer back on and return the print ribbon.

Find out specific information about Zebra Printer models:

Zebra P110i
Zebra P120i

Zebra P330i
Zebra P430i

Components of an HID Access System

DUPROXHID card-based access control systems consist of four main compents. These are: HID Cards, card readers, access controllers and the host access control software program.

HID prox cards – Access control cards have embeded information inside that consist of a number of binary numbers. This information identifies the card holder to the access system. There are many configurations available with these cards that are used for different applications and provide security. Different options available can be used alone or in combination. Some of these options are iClass contactless smart cards, MIFARE, magnetic stripe, Wiegand and 125 kHx prox.

Card Readers – Card readers are designed to obtain the embedded information from the HID card and transmit it to the controller. The card reader is specific to the type of card that is set to the facility and cards that apply to the operation. The binary code is aquired, converted to a readable format and transmitted quickly for a access response.

Access Controllers – The control is where the granted access is provided or denied. The controller accepts the data sent from the card reader and it processes the data. By reviewing the length of the code and by reviewing it’s seperate parts, the controller scans the database for exact matches. If found, the controller allows access to be granted.

Access Control Software Program – This program is controlled by security personnel to authorize specific cards for specific access. Restrictions and privileges can be granted to specific card holders for various authorization and specific times. The program also allows personnel to change the configuration of the access control hardware so that various doors and security needs can be authorized. It is through this program that the doors can be monitored and reporting can be generated for managment needs.

Find out more information about HID card best practices.

HID Prox Cards – Best Practices

DUPROX
HID prox cards are used to provide security for physical and virtual assets of an organization. With the correct use of access control systems, the companies confidential areas can be tightly controlled from unauthorized users.

When implementing an access control system, it is important that the processes set in place facilitate the desired security levels. One of the places in the security process that is vulnerable is the HID prox card. Without proper handling and clear procedures, the card will not provide the security measures needed. For success with these cards, the following recommendations are provided for your review.

1. Make sure that old prox cards are voided immediately. If not voided, an unauthorized person could locate and use the card.

2. Authorize cards upon inital issuance. If cards are pre-validated and spare, the card can be used inappropriately.

3. Investigate situations where access is denied with a non standard denial response. “Card out of range”, “unrecognized,” and other responses indicating incorrect facility codes and formats indicate an illegally obtained card may have been used to attempt access.

4. Use security mechanisms on the card, such as a hologram, to discourage tampering with the card and increasing security levels.

5. Use RFID shield devices when appropriate.

6. Advise card holders to display their badge only when on company property.