ID Flow Software – Text Formatting

Learn how to format text when designing a custom ID card with ID Flow software.

FOR STATIC TEXT

1. Click on the T icon.
2. With your mouse, draw an approximate text box and type in text in the white area.
3. Highlight the text to format.
4. You may click on the color box to change the text color and then click ok.
5. If you click on the properties tab, you may select a desired style.
6. Use the adjustment tools to center the text.

FOR TEXT FROM THE DATABASE

1. Click on the T icon.
2. Draw a text box on the card layout.
3. In the text dialogue, click the plus field, select database field and then select the fields desired.
4. Alignment tools are provided in the text dialogue box.
5. On the properties tab, uncheck the word wrap and then click ok. The placeholders now appear in the template.
6. Adjust the size of the text box to clean up the template.
7. Click the live data checkbox to see your design using a record from the database (to edit, double click the text box & adjust as needed).

This video also demonstrates how to combine static and variable text. The orientation of the text can also be changed as demonstrated in the video.

For additional information about ID Flow or other ID card software products, contact our software experts at 888-485-4696.

ID Flow Software – Working with Records

Learn about Working with Records in ID Flow Software

The video above walks step by step through a number of different database, record and picture adjustments that can be made with ID Flow software. This five plus minute video is packed with some of the following information:

Change field order and field properties (.15)
Fields can be moved with a mouse (.29)
How to change placement of the caption (.36)
How to change filed width (.45)
How to format text (1.04)
How to create drop down lists (1.20)
Photo information (1.43)
Advanced searches and sorting (3.17)
Create and clear filters (3.30)
Spreadsheet viewing (3.56)
Import/Export information (4.14)

For additional information about ID Flow or other ID card software products, contact our software experts at 888-485-4696.
Benefits of Plastic Cards for Car Registrations

Correct identification of vehicles and vehicle owners is achieved by the vehicle registration process. Registration provides a method to tax vehicle owners efficiently and provides other additional benefits to the state. The vehicle owner is provided with a proof of registration by means of a printed paper. The motor vehicles authorized printing centers provide and distribute the paper registration to carry during vehicle operation.

The common paper version of the vehicle registration can be tampered with as there are few features of the cardstock that provide security and longevity. The current paper version of the registration can be easily torn or smudged.

ID card professionals from the manufacturer of Zebra printers have proposed that vehicle registration cards be printed on plastic cards similar to the current state driver’s license. Benefits to the plastic card over paper are many. Some of the benefits that Zebra has offered for upgrading to a plastic registration card are as follows:

Security. Paper registrations can be easily altered, torn and smudged. Plastic cards are more difficult to tamper with and can be enhanced with various security features, such as a hologram to reduce the amount of fraudulent activities.

Durability. The longevity of a plastic card registration is greater than a document printed on paper. For this reason, employee IDs and driver’s licenses are commonly printed on plastic cardstock rather than a laminated paper or teslin from just a few years back.

Efficient data transmission. Plastic cards can hold information embedded on the card that can easily be transmitted for efficient processing of information. Bar codes, magnetic stripes and embedded information can be used for quickly and accurately providing and transmitting data to record events such as vehicle inspections, vehicle transfers and ticketing. By quickly scanning cards into appropriate readers, the data can accurately be imported into summons papers, inspection reports and other records.

Benefits of the plastic card printing can be worthwhile as increased efficiencies and easy transfer of information can outweigh the costs of the system many times over. Online card printing retailers that provide Zebra card printers are happy to provide a custom printing package to meet your individual small or large card printing needs.

Visit our Zebra ID card printer models for specific printer information.
Zebra P110i
Zebra P120i
Zebra P330i
Zebra P430i

Magicard Printer – How to Fit the Holokote Watermark on a Magicard Rio or Tango

Magicard ID card printers provide additional card printing security levels with the HoloKote watermark. This Magicard video illustrates how to fit the HoloKote watermark on Magicard ID card printers.

1. Ensure the printer is switched off.
2. Insert the HoloKote key.
3. Switch the printer back on. A steady green light indicates you can start printing.

For more information about Magicard printer models, contact our ID card experts at 888-485-4696.

Magicard Printer – Replacing the Printhead

Magicard printers can often be serviced by the user. Magicard has developed a number of videos to illustrate how to keep your printer in top running condition. The following video illustrates how to replace a printhead in a Magicard ID card printer.

1. Switch off the printer and unplug the power lead.
2. Open the printer and gently disconnect the cable connector from the printhead.
3. Using a screwdriver, unscrew the printhead fasterner.
4. Be carefuly not to touch the printing edge.
5. Unhook the printhead.
6. Hook the new printhead into position and secure it.
7. Gently push the connector into position.
8. Make sure a ribbon is in place. Clost the lid and switch the printer on.
9. A steady green light indicated you can start printing.

For more information about Magicard printer models, contact our ID card experts at 888-485-4696.

How To Network Jolly Products

Instructions to network Jolly software products are as follows:

Moving the Company Source (the central networking file) to a network server

1. Load the software on a workstation
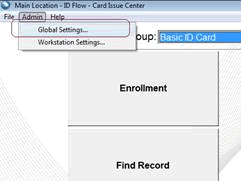
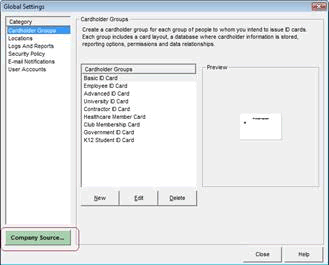
2. In ID Flow Card Issue Center, click Global Settings

network iinformation

3. Click on Company Source

network iinformation

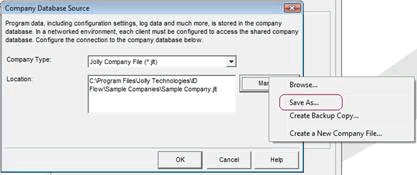
4. Click “Manage” then “Save As” and save the company file to a Server Location

network iinformation

5. To network a second workstation, go through the same steps and at the final step, select “Browse” instead of “Save As” and browse to the Company.jlt file that you moved in the previous step. The software is now networked.

Moving Cardholder Databases to a Network Server

1. By default the sample company database is stored on:
C:/program files/jolly technologies/id flow/sample databases/sample database.mdb

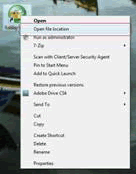
In Windows 7 and Vista the shortcut to get there is to right click on the ID Flow or Lobby Track Icon and select “Open File Location” in Windows XP, right click on the Icon, go to properties, the click file location:

network iinformation

2. Copy the “sample company.mdb” and paste it to the network server location

3. Click the “Properties” button to get to the Cardholder Group Properties dialog
(this is a shortcut, you can also get there by clicking edit on the highlighted cardholder group in Global Settings)

network iinformation

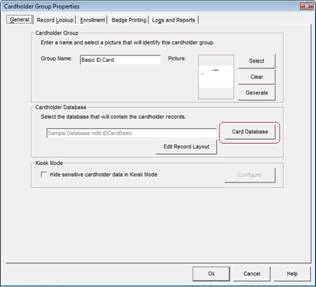
4. Click on the “Card Database” button

network iinformation

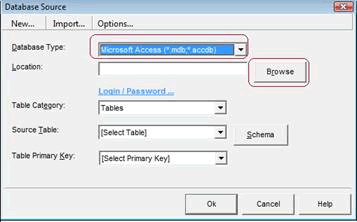
5. Change the database type to Microsoft Access and then browse to the .mdb file you placed on the server

network iinformation

6. On the same dialog above, you will need to select the source table for the cardholder group and then select ID Number for the primary key.

7. If there are more than one cardholder groups the customer is using, repeat steps 1-6 in this section for each cardholder group.

For more Information about ID Flow and Lobby Track, contact our software experts at 888-485-4696.
Magicard Printer – Replacing the Cleaning Roller

The following video from Magicard demonstrates begins at the process of replacing the cleaning roller in your Magicard ID card printer.

1. The printer comes with a cleaning roller which should be replaced when you change the print ribbon.
2. Remove the cleaning cassette.
3. Remove the used roller from the cassette.
4. Detach the protective cover from the new roller.
5. Place the new roller into the cassette.
6. Fit the cleaning cassette back into the printer.

For more information about Magicard printer models, contact our ID card experts at 888-485-4696.

Evolis Pebble Printer – How to Clean the Cleaning Rollers

The Evolis Pebble ID card printer will provide colorful, personalized ID badges for many years. In fact, Evolis believes in their printers so much they provide a three year warranty on this printer which is one of the longest manufacturer warranties in the business.

To keep your printer working at it’s best, it is important to follow manufacturer recommendations for maintenance. The following Evolis video demonstrates how to clean the cleaning rollers in an Evolis Pebble printer.

1. Open the printer cover.

2. Remove the printer ribbon.

3. Locate the cleaning roller and remove it from its housing.

4. Use a cleaning wipe provided by Evolis.

5. Remove any dust by gently rubbing the wipe across the roller surface.

6. Once the roller is clean and dry place it back into the printer.

7. Set the ribbon back into the printer.

8. Close the printer cover.

If you are interested in information about the Evolis Pebble printer or other Evolis printers available, contact our ID card experts at 888-485-4696.

Evolis Pebble Printer – How to Clean the Printhead

For best ID badge printer performance, it is recommended that you keep your printer as clean as possible. To keep the printhead free of any dust particles, follow the manufacturer’s recommended cleaning schedule. The following Evolis video displays how to clean the printhead with a cotton swab from your Evolis cleaning kit.

1. Unplug the power cable to power off the printer.

2. Open the printer cover.

3. Use a cotton swab from your cleaning kit and press the center of the tube until it clicks and releases the cleaning product.

4. Gently apply the cotton swab onto the printhead moving it from left to right and for a few seconds.

5. Close the cover.

6. Wait a couple of minutes before using the printer until the cleaning product has dried.

7. Reconnect the power cable.

If you are interested in information about the Evolis Pebble printer or other Evolis printers available, contact our ID card experts at 888-485-4696.

Evolis Pebble Printer – How to Print a Test Card

1. Make sure a ribbon is installed in the printer and that a blank card is loaded in the feeder.

2. Switch off the printer by pressing the push button for a few seconds. The green LED light switches off.

3. Then power on your printer while simultaneously pressing the push button.

4. Release the button when the LED light starts blinking.

5. The test card is printed within seconds. It displays information such as the printer model and serial number.

6. The test card is then ejected into the output hopper.

If you are interested in information about the Evolis Pebble printer or other Evolis printers available, contact our ID card experts at 888-485-4696.