Persona C30e – How to Calibrate the Ribbon

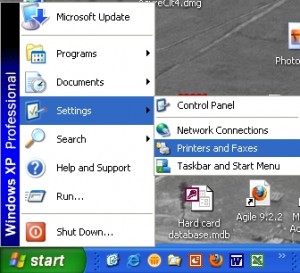
To calibrate the ribbon sensor, click the Start button in the lower left corner of your monitor and select Settings. Then select Printers and Faxes. Depending on your installation of Windows, you may need to go to the Control panels and then select Printers.


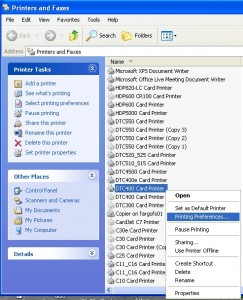
In the Printers and Faxes window, Right Click on the driver for your printer and select Printing Preferences from the list.

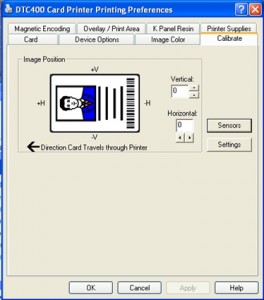
In the Persona C30e Card Printer Printing Preferences window, Select the Calibrate tab and then click the Sensors button.

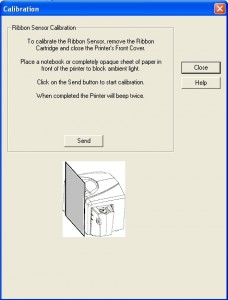
For the C30 and C30e printers follow the instructions in the Calibration window to calibrate the ribbon sensor. When the calibration is complete, the printer will beep twice.

Note that for the C30 or C30e printer, you must cover the front of the printer before clicking the send button to prevent ambient light from entering the printer as it may negatively impact the ribbon calibration process.

For information about Fargo printers or other photo id card systems, contact our ID card experts at 888-485-4696.

Evolis Pebble 4 – All the Lights are On

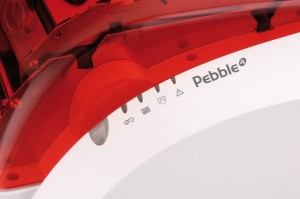
If you are trying to print cards with your Evolis Pebble printer and find it not functioning properly, some setup changes or adjustments may be needed. If you notice that all the lights are on (indicator lights above the main power button/light), follow the steps below to see if the problem can be fixed.

Pebble 4 - All the lights are on

Verify Printer Set-up:

  1. Make sure cards are loaded into the card hopper, the card hopper is properly fitted to the printer, and there are no obstructions in the hopper or the card input path.
  2. Check the card thickness gauge and set it to a value just above the thickness of your cards. (e.g. – if you use standard 30 mil cards, set the gauge lever just above 30, to approximately 32 or 33).
  3. Make sure you have print ribbon remaining on the current spool, and that it is loaded properly. If you are unsure about the proper fitment of the ribbon, there is a manufacturer’s sticker on the inside of the ribbon cover that depicts the proper placement.
  4. Verify that the USB or the network connection is firmly attached to both the printer and the host computer or network jack or switch.
  5. Ensure the power connectors are firmly and properly seated at each of the wall-plug, the AC/DC adapter, and the printer. While doing so, also verify you have the correct power adapter – Evolis original-equipment AC/DC adapters are branded as either “Evolis” or “SwitchBox”, and have output power of 72w (24v @ 3A).

Verify Computer Set-up:

  1. Open the Windows “Devices and Printers” view (“Printers and Faxes” if Windows XP). You can find this link from Windows Control Panel.
  2. See if you have just one, or multiple instances of the Pebble printer listed (e.g. – “Evolis Pebble”, “Evolis Pebble (Copy 1)”, etc.). If multiple instances exist, the ones that are “greyed out” can and should be removed sequentially by right-clicking on each icon, then selecting “Remove this Device”. You should then be left with just one, functional instance of the printer/driver.
  3. Disconnect the power to the printer, or power off with a 2 second push of the printer power button.
  4. Clear the Windows print queue by right-clicking on the Evolis Pebble printer and selecting “See What’s Printing”. When the print queue view opens, if any pending or in-process print jobs are present, click “Printer” on the menu bar, and then click “Cancel All Documents”. Verify with “OK” if requested. Wait for all jobs to clear before closing the queue view.
  5. Determine which ribbon is in the printer and ensure the Windows print-driver is set for use of this ribbon type as follows:
    1. Locate then right-click on your Evolis Pebble printer, then select “Printing preferences”.
    2. Near the top of the “Graphics” tab, you will see a ribbon designation, and a drop-down box that allows you to set the ribbon type manually. Ensure this setting matches the ribbon you have loaded in the printer. The most common settings will be the R3011 ribbon, when printing full-color cards, or R2011 when printing black-only, monochrome cards.
  6. Reconnect or power-up the Pebble printer again.

Confirm the Results:

  1. Once again open the Windows “Devices and Printers” view (“Printers and Faxes” if Windows XP).
  2. Locate the Pebble printer, then right click on it and select “Printing Preferences”.
  3. Select the “Tools” tab, then click the “Test Card” button on the top-left of the screen.
  4. If a test card prints normally, you have verified that the printer is set up properly, and that Windows has been set up properly as well.

Verify the Software Set-up:

There are a variety of card-printer software packages available, so our advice here is limited and generic:

  1. Open the software program you use for card-printing;
  2. In your printer settings, ensure that you are directing card output to the Evolis Pebble printer;
  3. Verify that any document or page set-up options, including portrait/landscape orientation, margins, paper (card) size, and range / record selections have been made properly.
  4. If one card template or file is causing issues, try another to see if it works. If one works, but another does not, your problem is with the setup options of the non-working card file.

Following the steps above will usually resolve a Pebble printer issue when all the lights are on,  If the problem persists, additional steps may be needed to reset the printer. Evolis printers purchased from Safe-Card ID come with free telephone technical support for the life of the printer. If you are such a client and need personalized assistance, we’d be happy to help you! Contact us toll-free at +1 888.485.4696, and have your customer or invoice number handy, along with the printer serial number for fastest service.

Persona C30e – Wrong Ribbon Error

A wrong ribbon error received on a Fargo Persona C30 or C30e card printer usually is caused by an incorrect printer driver setting. Below, we will detail how to correct this error by adjusting the settings in Windows.

Adjusting Print Driver Settings with Printing Preferences

** Note – to make the changes referenced below, your Windows logon ID must have administrative privileges, or have elevated privileges sufficient to allow for the modification of device drivers. **

To correct the Persona C30/C30e wrong ribbon error, you will first need to locate the device driver settings. You can access the via the “Devices and Printers” screen, accessible through Windows’ “Control Panel”. (For legacy users still operating Windows XP, use the “Printers and Faxes” screen, also accessed via “Control Panel”.) Once you’ve opened this screen, locate and right-click on the Persona C30/C30e printer, the highlight and left-click “Printing Preferences”.
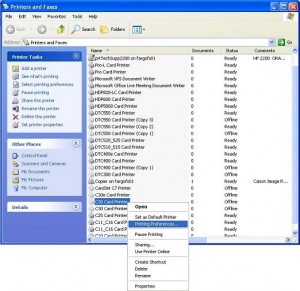
Screenshot of Printer and Faxes Window, fixing a C30e wrong ribbon error
When the Printing Preferences window opens, select the Device Options tab.
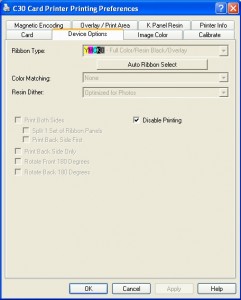
Screenshot of Printer Preferences Window, fixing a C30e wrong ribbon error
From within the Device Options tab, select the correct ribbon type. Alternatively, you can automatically set the driver to the correct ribbon type by clicking the “Auto Ribbon Select” check-box. After selecting the correct ribbon type, click the “Apply”, then “OK” buttons to save any changes. (** Note – if the “Apply” and/or “OK” buttons are grayed out and non-functional, this indicates that you do not have the required Windows privileges to make driver changes.)

Next, close the program from which you print your cards, then restart it. This will allow that program to recognize and utilize the new driver setting.
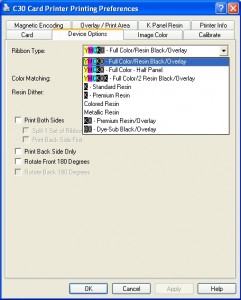
Screenshot of Device Options Tab, fixing a C30e wrong ribbon error

Quick-Tip:

If you are unsure which ribbon type you use, locate the part number on the original box. Compare that number to the ribbon configuration options, below, setting the driver to the one appropriate for that ribbon. For example, if the box indicates a Fargo #044200, set the driver to “YMCKO – Full Color/Resin Black/Overlay”.
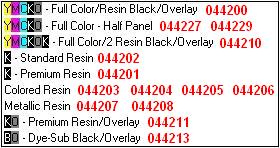
C30/C30e Ribbon Colors and Part Numbers

Wrong Ribbon Error Still Not Resolved?

For more information about wrong ribbon errors in Fargo printers, please visit this post on the topic, which covers several other potential problems. If you think that you may have out-of-date firmware or drivers, this post details how to update those, which will help ensure that your printer can recognize the most currently produced ribbons.

We are proud to offer free phone support for our clients! Therefore, if you purchase your supplies or printers from us, one of our technicians will walk you through these adjustments. We’re also happy just to chat or to provide more information about Fargo printers or other photo ID card systems. You can reach our ID-card experts toll-free at +1 888.485.4696 (from the US or Canada), or +1 704.535.5200 (elsewhere).

Safe-Card ID Services is an authorized dealer and service center for Fargo printers, Asure ID software, and related supplies.

HID Global is a leading global provider of secure identity products and services under the Fargo, Asure ID and HID brand names.
Barcode Printing Inconsistently with a Fargo DTC550

Note that the Fargo DTC550 ID-card printer is out-of-production (since 2011), and is considered obsolete (since 30-Sep-2016). The recommended replacement models are the Fargo DTC4500e and the Fargo DTC5500LMX.

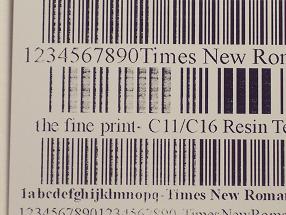
If you are printing with a Fargo DTC550 printer and the printing of bar-codes is inconsistent, you will find that bar-code scanners will not recognize or read the code. To correct problem with the Fargo DTC550 printers, you can follow this tech-tip:

ID-Card Bar-code Image

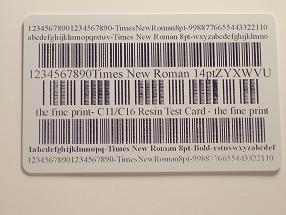
Light printing at one-end of the black-ink bar-code can be caused by a misalignment in the angle of the print-head. Note in the picture above how the bar-code is light and inconsistent to the left of the card, and then darkens to normal toward the center. A properly adjusted print-head will result in bar-codes being consistent and uniform across the entire surface of the printed card. Note that, after adjusting the angle of the print-head, it may be necessary to raise the Ribbon Peel-Off Bar. That procedure is address separately in our blog entry: Fargo DTC550 Peel-off Bar Adjustment.

Please consult with the technical support area of the vendor or integrator where you purchased your printer to obtain assistance for your specific printer issue prior to making any adjustment. Additional information may also be available directly on the manufacturer’s web-site, and in their technical support pages. Again, as this is a discontinued and obsolete model, on-line documentation and support from Fargo may be limited.

Still need help?

If you need further assistance, or for information current Fargo printers, contact our ID-card experts toll-free at +1 888.485.4696 (US & Canada), or at +1 704.535.5200 elsewhere.

Fargo DTC500 With a Ribbon Peel Off Bar Line

Our Fargo technical representatives are sharing some common issues with ID card printing. If the following picture looks like the card printing problem you are having, the ribbon peel off bar may need adjustment.

The dark area at the beginning of the card is caused by the “Ribbon Peel-Off Bar” being adjusted too low. When the printhead starts printing the printhead pressure is normal until the card goes under Ribbon Peel-Off Bar. The remainder of the card is printed too light because the Ribbon Peel-Off Bar lifts the printhead slightly off of the card.

To correct this problem it is necessary to raise the Ribbon Peel Off Bar slightly.

Please consult with the ID card intergrator technical support area where you purchased your printer to obtain assistance for your specific printer issue prior to adjustment. For information about the Fargo DTC550 and current Fargo printers, contact our ID Card experts at 888-485-4696.

Current News: Asure ID 7 Release

HID Global has announced the release of Asure ID 7, the latest update to its industry-leading card personalization suite of software. Building on the popular Asure ID 2009 software, Asure ID 7 features new navigational enhancements and advanced printing capabilities designed to simplify the entire process of card issuance from entry-level uses to more sophisticated secure credential applications.
Asure ID 7 includes four versions tailored to the various needs and sizes of an organization:

Asure ID Solo–easy to use and perfect for entry-level card personalization, Solo is loaded with useful features to improve the issuance and basic management of photo IDs.
Asure ID Express–the ideal choice for organizations looking for affordable photo ID card software with advanced card design and batch printing capabilities.
Asure ID Enterprise–featuring Live Link™ for large organizations that require multiple workstations to share a common database over a network in real time.
Asure ID Exchange–designed for the most sophisticated secure credential applications combining Live Link advanced database support and iDIRECTOR technology card design for smart card deployment

Currently registered users of Asure ID 2009 are able to receive a free upgrade to Asure ID 7. New customers are also eligible for a free 30-day trial at HID’s website.

Click on the CD for your upgrade or free Asure ID 7 trial.

For information about ID card software options such as Asure ID software, contact our ID card experts at 888-485-4696.

Fargo DTC500 Prints A Light Bar Code

Printing ID cards sometimes is difficult as the exact card specifications are critical to the success of the identification program. One important printing requirement is a correct, dark version of the provided bar code. If your bar code is not meeting your requirements, check out the pictures below and see if your problem is displayed. If so, we have recommendations for you.

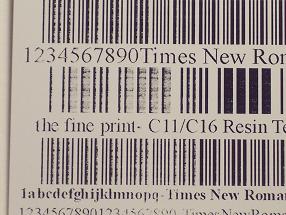
The light printing of the black in the center barcode is caused by the Ribbon Peel-Off Bar being adjusted too low. Note the horizontal streaking in the bars. Note also that the effect is across the full length of the card. (The light/dark banding on the upper and lower barcodes is due to “camera effect” and not to a problem with the printer)

To correct this problem it is necessary to raise the Ribbon Peel-Off Bar slightly.

The light printing of the black in the barcodes is caused by the angle of the printhead being to small. Note that the barcode darkens to normal as the print approaches the center of the card. Increasing the printhead angle will darken the beginning of the barcode. After adjusting the angle of the printhead it may be necessary to raise the Ribbon Peel-Off Bar.

To correct this problem increase the printhead angle by completing the printhead angle adjustment.

Please consult with the ID card intergrator technical support area where you purchased your printer to obtain assistance for your specific printer issue prior to adjustment. For information about the Fargo printers and current Fargo printer models, contact our ID Card experts at 888-485-4696.

Current News: Zebra ZXP Series 3 Printer Displayed at ISC West

The New Zebra ZXP Series 3 Printer is a new, technologically advanced ID card printer that Zebra Card is releasing soon. They provided demonstrations of the printer at ISC West during the first part of April. Features of this new printer are as follows:

The new ZXP Series 3 offers full smart card encoding capabilities, fast print speed, and high print quality—all for an affordable price. The full-featured ZXP Series 3 provides customers with the best-in-class direct-to-card printer. This competitive advantage gives Zebra and its partners a strong opportunity to gain market share in this highly competitive segment.

ZXP Series 3 printer’s multiple features and benefits include:
• Affordable on-site, on-demand direct-to-card printing
• Easy to use for reduced training requirements and improved productivity
• Compact footprint that fits in any work area
• Fast print speed for improved operations efficiency
• Zebra’s ZRaster™ host-based image processing technology for improved throughput and image quality
• True Colours® ix Series™ high-performance ribbons enable higher print speeds and image quality
• Flexible single- or dual-sided printing, color or monochrome
• Standard-based encoding, including PC/SC and EMV-certified smart card encoding, over USB and Ethernet
• Security options such as EMV smart card encoding and locking enclosure for financial card printing

Zebra Card has a projected release date at the end of this month or early May.

For information about Zebra Card Printers and other ID card printers, contact our ID card experts at 888-485-4696.

Fargo DTC550 Printer Prints ID Cards with Smudges

When an ID card is printed, sometimes it enters the output hopper with smudges appearing to be fingerprints. If you are wondering what to do, the following may provide the answer for you.

If your card looks like this:

You need to know that the white smudge marks are caused by contamination on the card surface which prevents the color from adhering to the card surface.

The problem can be the result of fingerprints on the cards. Always handle cards by the edges. If the problem persists on a number of cards, replace the card stock with a clean group of cards.

If your card looks like this:

The dark smudges are caused by fingerprints on the ribbon prior to printing the card.

This problem can normally be solved by careful handling of the ribbon during removal/replacement. Always handle ribbon by the spindles. This problem will usually disappear after printing a couple of cards.

Additional Fargo technical tips provided by Fargo authorized technical representatives are available through this blog. If you need additional assistance with Fargo printer information, please contact our ID card specialists toll free at 888-485-4696.

Current News: ID Badge Law for Medical Providers in Pennsylvania


The Pennsylvania House Bill 1482 was signed into law by former Gov. Ed Rendell on November 23, 2010. This law requires health care providers to wear a photo identification badge while working. The law is beneficial to patients and their families as it will identify the type of provider servicing them. The levels of education and training a provider has received will be easy for users of health care services to verify with this type of worn credential.

Currently, there is clarification needed from lawmakers about the intent of the bill. The PA State Department of Health is requesting clarification as to what groups of medical providers would be required to wear the photo identification cards while at work.

The effective date of the bill is also being determined. The Department of Health advises that they will give ample time for providers to source their id badging.

For assistance with your ID badge needs, visit our informational page or contact our ID card service bureau experts at 888-485-4696.