Category Archives: Zebra Printer

A Zebra printer is reliable and long-lasting when properly cared for. Check out our tips and advice! They’ll help you get the most from your investment.

Retransfer vs. Direct-to-Card Printers

Retransfer vs. direct-to-card printers: when considering how you want to produce your highest-grade, professional ID-cards, you must decide between the two. The announcement of Evolis’s Avansia retransfer printer in 2015 raised a key question among many clients: What is the difference between a retransfer printer and a direct-to-card printer?

The short answer? It’s all about how the printer applies your card design to the ID-card. One method first applies the card image to a thin film, and then transfers the complete image onto the card in one pass; the other prints directly onto the surface of the card (I know! I was surprised too! 🙂 ).

Below, we’ve broken this down into 4 sub-questions to compare the two. And we briefly discuss the inner workings of retransfer vs. direct-to-card printers. If you’re more interested in the differences than the inner-workings, feel free to skip the next section.

Retransfer vs. Direct-to-Card Printers: the Methods
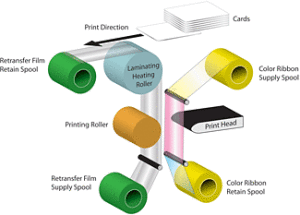
Process Retransfer vs. Direct-to-Card Printers

Retransfer print process image courtesy of Magicard.

With retransfer printers, your card design (images and text) are first printed onto a clear “transfer film”. This is accomplished through a series of passes, one for each color being applied or created. The full, finished card-image is then thermally fused to the card’s surface. The transfer film helps protect the printed card details from abrasion and color fading, due to UV-light sources.

On the other hand, direct-to-card printers place the images and text directly onto the card. With this method, the card and print-ribbon pass over the stationary print-head, sequentially applying yellow, magenta, cyan and black ink (YMCK) to create virtually any color. After applying the color inks, the printer then applies a clear varnish across the full surface of the card, so as to protect the printed image.

What are the differences in results?

By laying the film over the card, a retransfer printer is capable of “over-the-edge” printing that maximizes the card’s surface area. Because the transfer film and applied image can be slightly longer and wider than the card itself, there is no visible margin. If you want a background image that covers the entire card, this is how best to achieve that result. The transfer film also acts as a protective barrier that renders the image slightly more durable.

A direct-to-card printer leaves a very thin border around the edges (only 1mm or so). This “near-to-edge” printing suffices if the card color itself serves as the background color for your ID design, or if full-card coverage is otherwise not required.

HID Global, maker of the Fargo HDP5000, HDPii, HDP5600 & HDP8500 retansfer printers states that retransfer printers create sharper, glossier images (a result of the gloss finish of retransfer films) while the clear varnish overlay applied by direct-to-card printers results in a matte finish. Importantly, the retransfer printing process is more forgiving of slight imperfections in a card’s surface. This is particularly beneficial if you print proximity access cards or smart-cards, as there is often a slight “dimple” on the card surface in-line with the internal electronic components. The retransfer method can also mask minor surface scratches, and even fingerprints.

Direct-to-card printers might not correctly render images over such surface items, resulting in imperfect color(s), or leaving small areas unprinted. Note that you can prevent some causes of these card-surface and print-quality issues by taking measures to protect your unused cards:

  • Handle cards only by their edges to prevent fingerprints from affecting printable surfaces.
  • Store unused cards in a closed container, and in a clean and dry location to avoid dust and surface damage.

What are the similarities?

Both print processes involve application of a full-card image, via thermal print-ribbons to the card surface – the retransfer printer just includes an additional step due to the use of retransfer film.

Both are designed to create durable cards. But all cards are subject to wear. To get the maximum life out of your cards, employ composite cards, add a lamination module to the printer (optional on certain printers), or wear finished cards within protective badge holders.

What materials do they require?

Both printer types require the use of color or monochrome print-ribbons. Retransfer printers additionally require clear retransfer film, on which the card design is first printed and then fused to the card. Typical ribbon designations for retransfer printers include YMCK & YMCKK.

Rather than using a retransfer film, direct-to-card printers use ribbons with an integrated varnish-overlay. This clear vanish overlay is applied as the last step in the print process, to protect the image from wear and fading in sunlight. Typical DTC ribbon designations are: KO, YMCKO, & YMCKOK.

The Bottom Line

Deciding between retransfer and direct-to-card printers really comes down to your use case. The retransfer printer helps you maximize your card’s surface, is more forgiving of imperfections, and is generally regarded as producing a better, glossier image. The direct-to-card printer removes the need for retransfer film and applies your design directly to the card, eliminating a step. Finally, retransfer printers and their supplies generally cost more than direct-to-card printers and their related supplies, so your budget will play a role in deciding which is right for your organization.

At the end of the day, which printer you need is always going to come down to your specific requirements. Hopefully this blog entry will help you think through that process.

Need more info?

Questions? Concerns? Not sure what printer is best for you? Call our ID-card experts toll-free at +1-888-485-4696 (US & Canada), or +1-704-535-5200 (elsewhere) for a free consulation. We are always glad to help!

Value of High-Quality Consumables for ID Card Printers

Always use high-quality consumables, purchased from authorized dealers in your ID card printer. These supplies provide the best life and results from your machine. Safe-Card ID Services is one such dealer, but there are lots out there; find a dealer you trust!

But I saw cheaper consumables online…

Less reputable dealers may offer cards and ribbons that are “compatible” with your printer but are not certified. While you may find that they offer these at a discount, these savings may be an illusion. Recently, a local client ruined multiple print-heads by using sub-standard cards. Not only was this an inconvenience that interrupted their card production, it was costly. Printer manufacturers’ warranties do not cover print-head damage from poor-quality or non-genuine consumables.

What problems might low-quality consumables have?

Poor-quality cards may have foreign objects (dirt, dust, hair, and plastic particles), irregular sizing and thickness, and jagged-cut edges. In the best-case scenario, using these cards will require more frequent printer cleaning (to remove those foreign objects!). The worst-case scenario results in physical damage to the printer, specifically the expensive print-head.

Poor-quality ribbons may not be compatible with RFID sensors or printer firmware updates, leading to “no ribbon” or “unknown ribbon” errors, thus preventing their use. Non-genuine ribbons are often made with sub-standard materials. Use of these materials can lead to low-quality images, rendering of colors inconsistently, and ribbons tearing and sticking to card surfaces, all of which can also cause damage to the print-head.

Why are high-quality consumables such a big deal?

All printer manufacturers stipulate that the use of non-branded or low-quality materials can void printer and print-head warranties. While great online deals can be tempting, it is important to make sure that the materials are of high quality–both to preserve your device warranty and to ensure the best possible output.

The bottom line: be sure to inspect materials before using them. A broken printer costs more to replace or repair than you could ever save with aftermarket or “gray-market” supplies. Find a trustworthy, authorized dealer for your printer consumables and rest assured that your printer investment will be protected.

How to Clear a Card Jam in a Zebra ZXP Series 7 Printer

Card jams are an occasional problem with any PVC card printer. The Zebra ZXP Series 7 printer is no exception. Zebra has made it easy to clear a jam from these 7 printers, as demonstrated in the short video below.

Instructions

  1.  If your printer stops, check Operator Control Panel and determine if the fault is a card jam.
  2. If so, open and close print cover (or options cover).
  3. This will cause the printer to initialize and move the jammed card to the reject bin (located to the right of OCP).

As always, if you have trouble clearing a jam or any other concerns with your Zebra ZXP Series 7 or any other card printer, call our experts at +1 888.485.4696.

For supplies for the Zebra ZXP Series 7, please browse our selection of ribbons, cards, and cleaning kits.

Zebra ZXP Series 1 and Series 3 Windows® Driver Maintenance Enhancements

While this post and these updates are specific to Zebra ID card printers, this is a great time to remind all of you to check periodically for firmware and driver updates for your ID printers, regardless of make or model. While some of the updates seem minor, manufacturers constantly tweak their products to make sure they work as well as possible. The updates can include anything from fixes for bugs to support for new features to improvements in speed or print quality, which we all want!

This particular update from Zebra is to Version 5.30.00 and is available on the printer pages for their ZXP Series 1 and Series 3 printers. The update will also be included on driver CDs included with all printers manufactured starting September 2014.

The update improves network printing performance and resolves some previous driver release issues. These and other changes are detailed in the release notes that accompany the driver updates at the links provided above. These notes are brief and provide some helpful extra information, so they’re worth checking out if you have one of these printers (they may even help address a concern  you’ve had with your printer!).

As always, if you need assistance applying these updates, or if you should have any questions, you can call and speak with our experts at +1 888.485.4696 or +1 704.535.5200. We are always glad to help!

Zebra P330i – Clearing a Card Printer Jam

To Clean a Card Printer Jam in a Zebra P330i, please follow these instructions:
1.  Push the card thickness guage to the uppermost position.  This guage is located on the left side of the card feeder.  This will decrease the tension on the card and allow you to easily pull it out.  Remember to reset the guage back to its original position before continuing to print cards.
2.  To eject the card, open the printer properties menu.  Select the device settings tab and then select the tools menu. There are two card eject buttons.  One ejects the card from the card engine.  The other one ejects the card from the feeder and the print engine.
3.  Turn the printer off and then on again.  The card will automatically eject when the printer is turned back on.


Find out specific information about Zebra Printer models:

Zebra P110i
Zebra P120i
Zebra P330i
Zebra P430i

Zebra P330i – Routine Printer Cleaning Recommendations


Printer Cleaning Instructions:

Clean the printer after 1000 color prints or 5000 monochrome prints. The LCD will display “clean printer” to remind you of this. For best results, clean the printer as soon as possible after this message displays.

1. Leave the printer on and press the button. Hold the button for 3 seconds. The LCD will display “remove ribbon and close head.”
2. Open the printer lid and push the blue release arrow forward. Lift up the printhead carriage..
3. Remove the ribbon spools.
4. Close the head carriage. The LCD with display “empty feeder and press button.”
5. Open the feeder lid and remove all cards but the bottom card. This card will remain in the feeder until you press the eject button.
6. Load the cleaning card in the feader. Place the small cleaning card in the card feeder. The belt will move it in halfway and continue to clean other parts of the printer. The small card will be ejected when it has finished cleaning.
7. The LCD will display “press button to continue.” Feed the long cleaning card into the card feeder exit slot. It will move back and forth as it cleans. The LCD will display “cleaning printer.”
8. When completed, the LCD screen will display “ready.” You may return the ribbon spools, reload cards and resume printing.

If you notice spots or streaks, you may need to clean the printhead.

1. Turn the printer off.
2. Lift the carriage and remove the print ribbon.
3. Sqeeze the plastic cleaning swab stick to move the liquid into the tip.
4. Move the moistened swab side to side across the elements. Wait 2 minutes.
5. Turn the printer back on and return the print ribbon.

Find out specific information about Zebra Printer models:

Zebra P110i
Zebra P120i

Zebra P330i
Zebra P430i

Zebra P330i – Installing an Extended Card Feeder


To add the 220 card extended card feeder to the Zebra P330i printer, follow the directions provided in the video.

1. Remove the feeder cover by pressing in on the left side and pivoting out the right corner.
2. Place the feeder extension on top of the printer case and align the holes.
3. Insert screws into the three holes and tighten slightly.
4. Place the bottom corner of the feeder onto the small raised pivot point. Place the top pivot point into the hole in the feeder extension.
5. Completely tighten the screws.

Find out specific information about Zebra Printer models:

Zebra P110i
Zebra P120i

Zebra P330i
Zebra P430i

Zebra P330i – ID Card Printing Tips


ID Card Printing Tips for The Zebra P330i Card Printer

1. Install the print driver.
2. Load the print ribbon, cleaning cartridge and the cards.
3. Plug in the correct power cord for your location.
4. Connect the USB cable to the printer and computer.
5. Turn on the printer.
6. The LCD will display “initallizing” and then “ready”.
7. Teh computer will recognize the printer.
8. Slide out the output hopper.
9. Begin printing.
8. The LCD will display the action of the computer during printing.

Find out specific information about Zebra Printer models:

Zebra P110i
Zebra P120i

Zebra P330i
Zebra P430i

For other Zebra printing tips see the following videos:

Zebra P330i – Using the Single Card Feeder>br/>
Zebra P330i – Installing A Print Ribbon

Zebra P330i – Loading PVC Cards

Zebra P330i – Installing Printer Drivers

Zebra P330i – Installation Tips

Zebra P330i – Using the Single Card Feeder


To set up the Zebra P330i printer for feeding single cards, follow the steps listed in the video.

First, the driver setting must be changed.
1. Empty the card feeder by removing the cards.

2. Use the eject command to remove the remaining id card in the printer.

a. Open the printer properties menu.
b. Select the device settings tab.
c. Go to the tools menu.
d. There are two eject card buttons to select from:

i. A button to eject the cards from the print engine.
ii. A button to eject the cards from the feeder and the print engine.

Second, insert the card into the slot under the feeder lid on the right side of the printer.

Third, the card will automatically be drawn into the printer with the print job is sent.

Find out specific information about Zebra Printer models:

Zebra P110i
Zebra P330i
Zebra P430i

For other Zebra printing tips see the following videos:

Zebra P330i – ID Card Printing Tips

Zebra P330i – Installing A Print Ribbon

Zebra P330i – Loading PVC Cards

Zebra P330i – Installing Printer Drivers

Zebra P330i – Installation Tips

Zebra P330i – Installing a Print Ribbon


Following are the directions to install a printer ribbon in the Zebra P330i printer:

1. Make sure that you will be installing a True Colors i series ribbon and it is recommended to leave the printer on during the printer ribbon installation.

2. Open the printer lid and push the blue release arrow forward.

3. Lift up the printhead carriage and remove the used ribbon.

4. Hold the ribbon spool in your right hand with the white end facing the printer. In your left hand, hold the empty spool. The tape should still be attached.

5. Make sure the ribbon feeds across the top of the spools.

6. Place the ribbon on the spindle located under the printhead carriage. Place the empty spool on the take up spindle to the left of the carriage.

7. Press the spools firmly onto the spindles.

8. Press down on the printhead carriage until it clicks into position.

9. The printer will automatically adjust the ribbon. If the ribbon was installed correctly the LCD display will display the word “ready”.

Find out specific information about Zebra Printer models:

Zebra P110i
Zebra P330i
Zebra P430i
Zebra P520i

For other Zebra printing tips see the following videos:

Zebra P330i – ID Card Printing Tips

Zebra P330i – Using the Single Card Feeder

Zebra P330i – Loading PVC Cards

Zebra P330i – Installing Printer Drivers

Zebra P330i – Installation Tips