Category Archives: Evolis Printer

Evolis Printer – Install an Ethernet Printer on Mac 10.4 and 10.5

Following are the steps to install the driver on a Mac 10.4 or 10.5:

1. Prior to starting the installation, plug in the printer to the Mac and make sure that you have Administrator rights.

2. Go to the Evolis website at www.evolis.com. Download the necessary driver and follow the instructions during your installation.

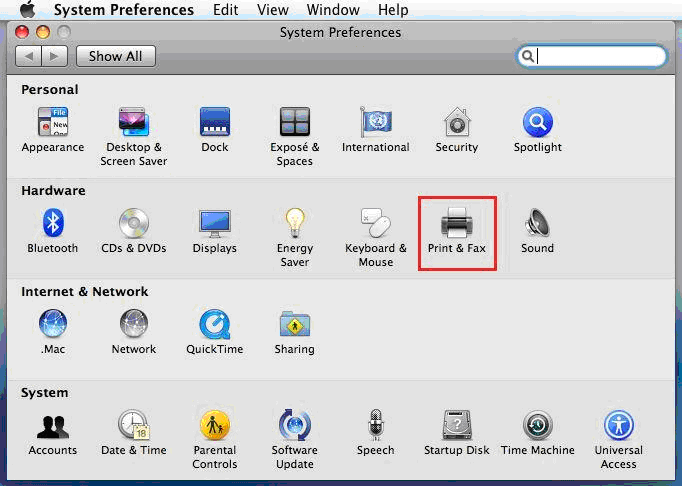
3. Open the System Preferences.
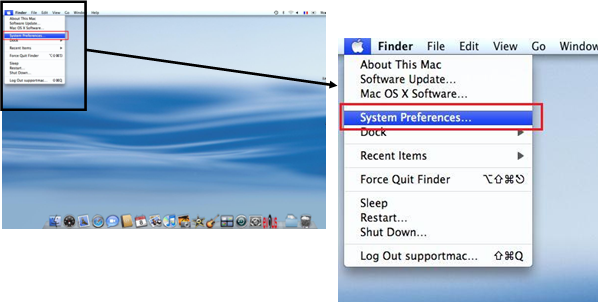
Mac Installation

Then open the printers and faxes.
Mac Installation

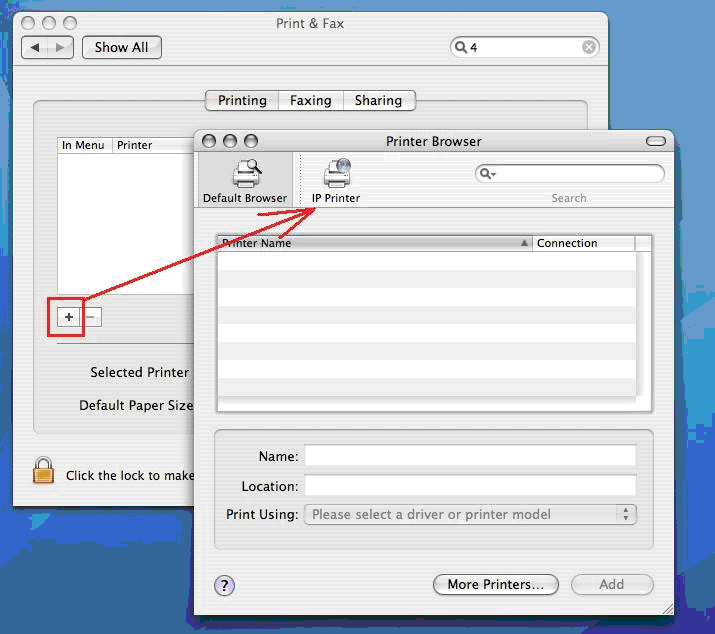
4. Click on the + to add and then click on the IP PRINTER button printer which should be already detected.
Mac Installation

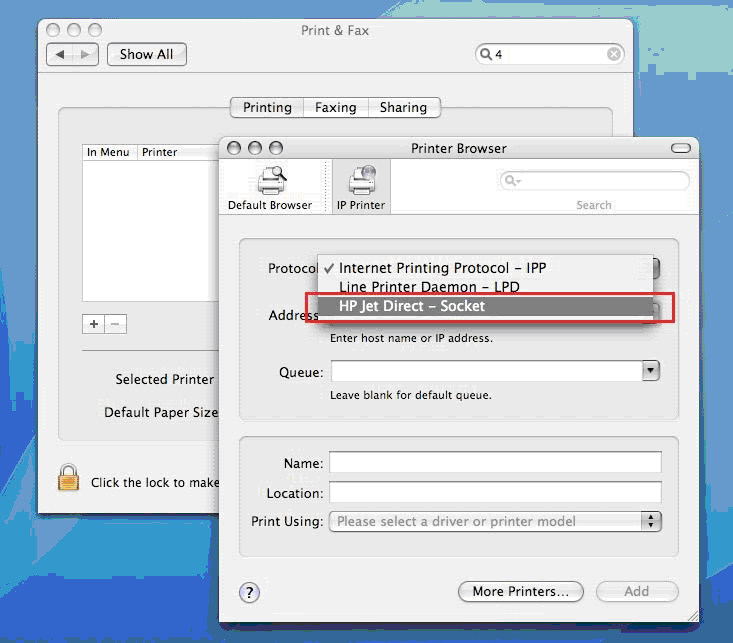
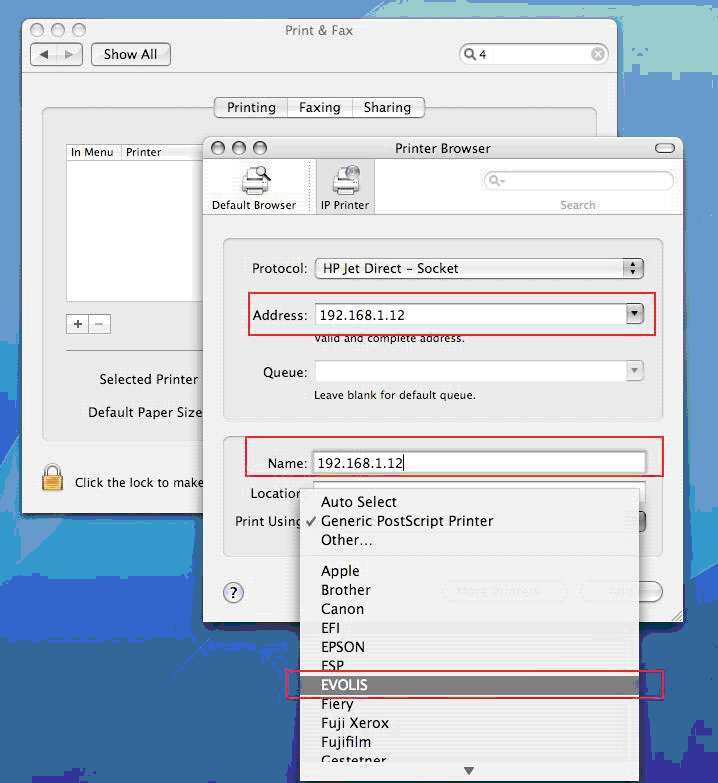
5. Choose the HP Jet Direct Socket option in the Printer Broswer section, choose Select a driver.
Mac Installation

6. Enter the printer’s IP address and select EVOLIS in the Print Using section.
Mac Installation

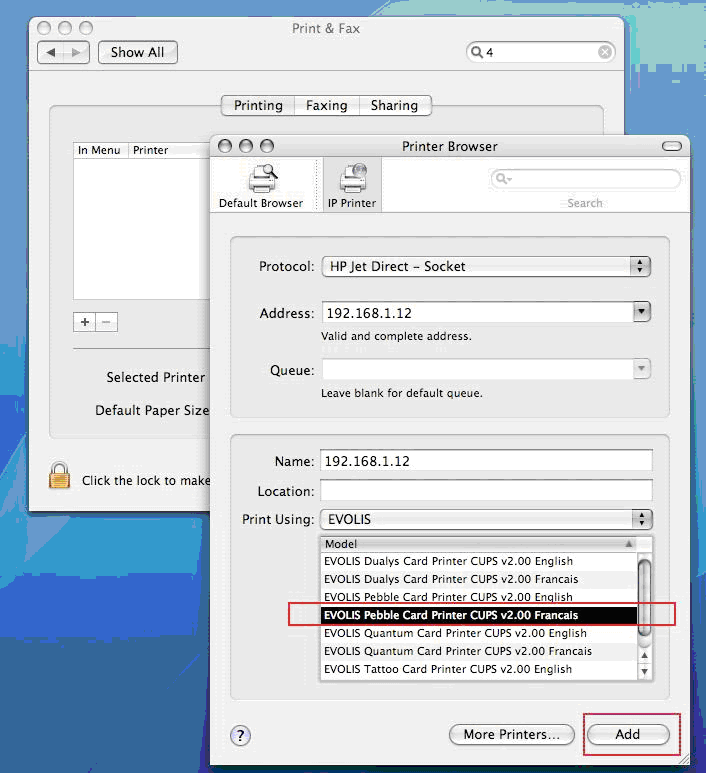
7. Choose in the menu list the Evolis driver and the language you need. Click on Add to validate your choice.
Mac Installation

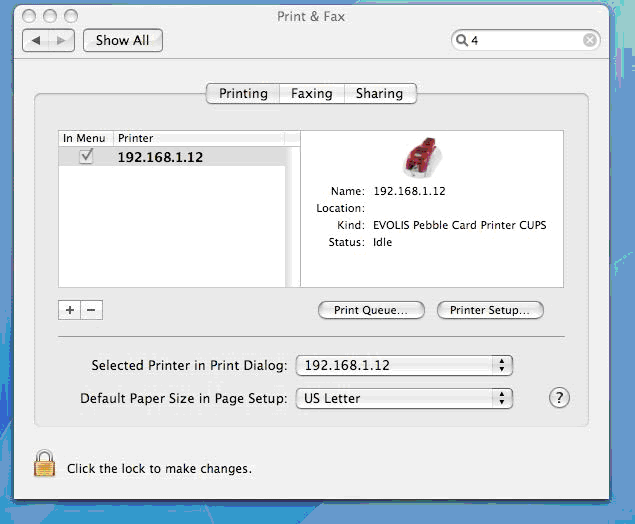
8. The driver in now ready to be used.
Mac Installation

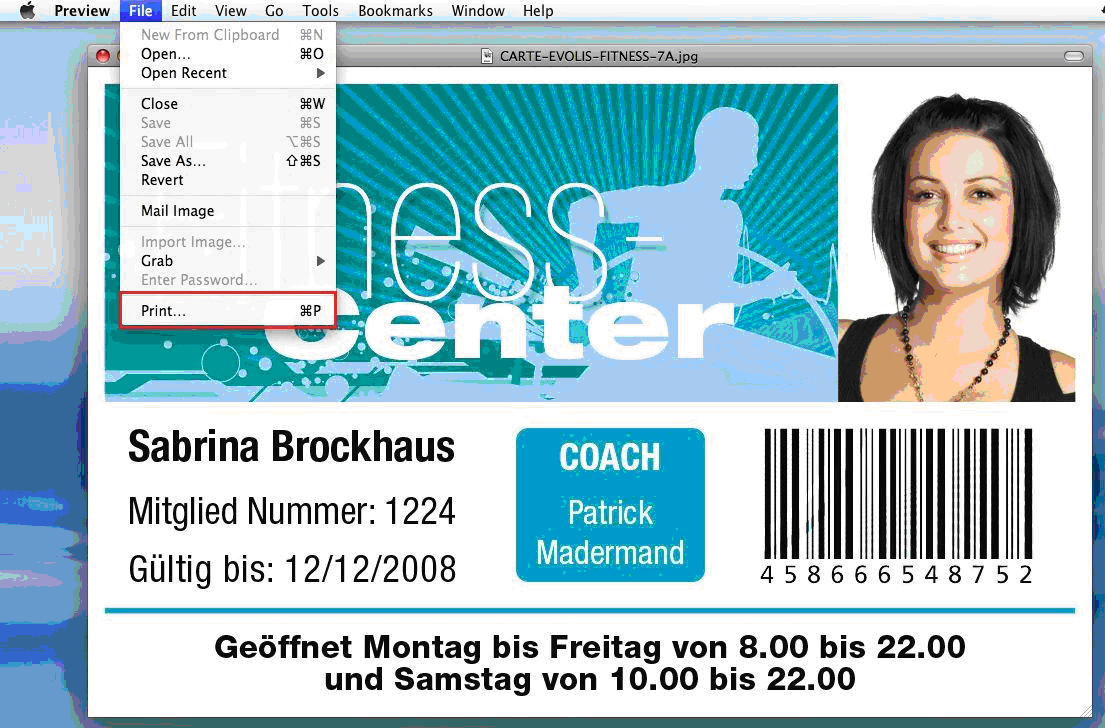
9. To print your design, open your card printing software. Click on file and print to access the printing properties.
Mac Installation

10. Make sure the correct driver has been selected for the printer and check the paper size in Card. Go to the printer features to access the Evolis driver properties if you need to communicate with the printer.
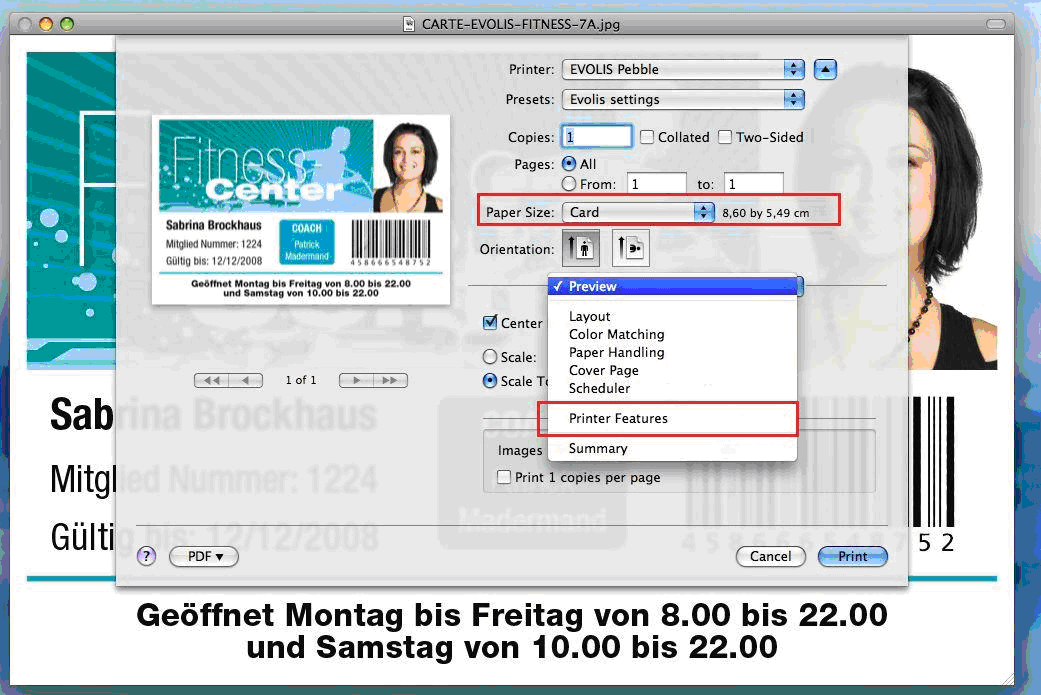
Mac Installation

11. Open the driver spooler from the Print and Fax section and click on Utility
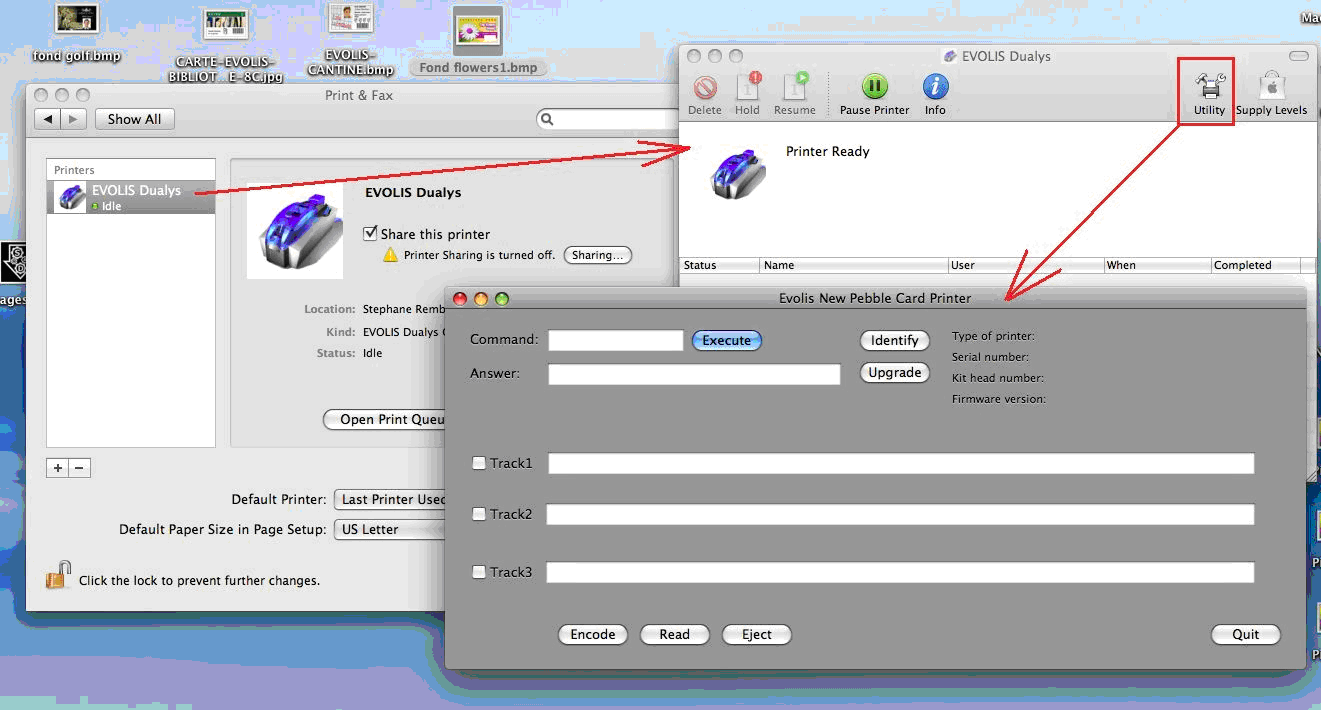
Mac Installation

For more information about Evolis printers, search our blog about Evolis printer support or call our ID experts at 888-485.4696.

Evolis Pebble – Setting the Correct Ribbon Settings

Evolis Pebble 4

The majority of people who print ID badges set the system up for the single badge design and are good to go. Other groups have various cards designs for various applications. Some of these cards may be full color and other cards may be single color. To save on costs, the single color cards can be printed using a single color ribbon and a ribbon change is made when switching from the single color to a multi color card.

If your cards are not printing correctly after switching out the ribbon, follow the following steps on your PC to adjust the printer and software to the new ribbon selection.

    • 1. Go to your computer start button.
      2. Select printers and faxes
      3. Select the Evolis Pebble and right click.
      4. Select printing preferences.
      5. On the graphic tab, the first selecton is “ribbon”. Select the correct ribbon for your new printing job. Click “Set Ribbon.” Click “Ok.”

When you open your ID card software, check the printer settings. Make sure that your ribbon selection is the same as the one you set in the printer driver.

For information about ID card printers or specific Evolis printers, contact us for a free consultation at 888-485-4696.

Evolis Dualys Printer – The Card Prints Black

When printing with an Evolis Dualys3 ID-card printer, and the card prints solid black, you likely have an improper print-driver setting. This problem most often occurs when printing dual-sided cards, where you intend the front-side to be full-color, with the back-side monochrome-black.

Evolis Dualys3 - Card Prints Black

The Cause of Card Prints Black Issues:

There doesn’t seem to be a definitive cause, but there is a high correlation with updates and upgrades to Windows, and onset of the problem. We believe that these updates and upgrades result in the Dualys3 printer driver being reset to its defaults. In particular, the “ribbon-type” parameter gets reset to assume use of a R3011 print-ribbon, rather that the R3314 ribbon.

The Fix for Card Prints Black Issues:

Prior to beginning the instructions below, please verify that you are logged into Windows with a user-ID that has administrative privileges. Alternately, ensure your ID has been granted elevated privileges sufficient to allow updating printer drivers. If you do not have the required privileges, contact your IT-support provider for assistance.

Step-by-step:

  1. If open, close the application you are using to print cards.
  2. Locate the Windows “Start” button (generally, in the lower-left corner of your screen).
  3. Access the device-driver settings screen, as follows:
    1. Windows 8.1 & Windows 10: Right-click the Windows icon, and select “Settings”, then “Control Panel”, then “Devices and Printers”.
    2. Windows 7: Left-click the Windows icon, and select “Devices and Printers” from the right-side menu. If that choice is not available, select “Control Panel”, then “Devices and Printers”. Note that, if accessing via Control Panel, you may need to switch the Control Panel default view from “Categories” to “Small Icons”, in the upper right of the screen.
    3. Windows XP: Left-click the Windows “Start” button, and select “Printers and Faxes” from the right-side menu. If that choice is not available, select “Control Panel”, then “Printers and Faxes”.
  4. In resultant window, locate the Evolis Dualys3 within the list of printers.
  5. Right-click on the printer then with a left-click, select “Printing preferences”. This will open the device-driver settings window.
  6. Ensure that the “Graphics” tab is selected then change the ribbon setting from “R3011 – 5-panel colour ribbon YMCKO” to ribbon type “R3314 – 6-panel colour ribbon – YMCKOK”.
  7. Single-click on the “Apply” button, then the “OK” button to save the setting change.
  8. Close the device view window, and the Control Panel window (if opened).
  9. Cycle the power on the Dualys3 either with the power button, or by unplugging for 5 seconds, and then plugging in again.
  10. Re-open your card-printing application and resume printing.

Following the above procedure should restore normal printing function for your Evolis Dualys3 printer.

Need more info?

Safe-Card ID Services is an authorized dealer and service provider for the full line of Evolis productions. For further information on or assistance with your Evolis printer, give our ID-card experts a call toll-free at +1 888.485.4696 (US & Canada) or +1 704.535.5200 (elsewhere).

Evolis Dualys 3 – Installing a Manual Card Feeder

Safe-Card ID presents a video illustrating how to install a manual card feeder on the Evolis Dualys 3 ID card printer.

How to install a manual card feeder in your Evolis Dualys.

1. Remove the card hopper.
2. Adjusts the card thickness gauge to 40 ml.
3. Insert the manual card feeder.
4. Go to the print driver.
5. Adjust the source tray and output tray to manual hopper.
6. Apply.
7. Insert the card.
8. Print the card.

For further assistance, contact one of our technicians at 704-535-5200; we look forward to hearing from you!

Evolis Badgy ID Card Printer

The new  Badgy ID card printer is the newest plastic card printer in the Evolis family of card printers.  The printer is a end to end solution to print badges yourself when you need less than 200 badges per year.  The printer will print full-color plastic id cards that includes photos and text. The printer package comes with 100 card count print ribbon and cards, card template options, software and a 300 dpi printer.

Following are the items included in the Badgy printer system:

  • Badgy printer
  • Software
  • USB Cable
  • 100 card print ribbon
  • 100 PVC cards
  • Cleaning kit

This printer comes with a one year printer warranty.

Our recommendation is to consider the benefits of the Evolis Tattoo 2 ID card printer prior to purchasing the Badgy printer.  For similar pricing, the Tattoo 2 printer offers a two year manufacturer warranty.  The Tattoo printer has a better print quality and also provides options to use a higher level software for increased security and functional use of the id card.

For details about either the Evolis Badgy printer or the Evolis Tattoo 2 ID card printer, contact our ID card specialists at 888-485-4696.

Evolis Dualys 3 – Cleaning the Printhead

SafeCard ID presents a new video demonstrating how to clean the printhead in the Evolis Dualys 3 ID card printer.

How to clean the printhead in your Evolis Dualys 3 id card printer.

1. Unplug the power supply.
2. Open the top cover.
3. Take a cleaning swab and break the vial allowing the fluid to run down to the swab.
4. Wipe the swab back and forth across the printhead.
5. Close the top cover.
6. Plug back in the power supply. This will reset the printer and ribbon for your next print job.

Evolis Dualys 3 – Clean the Card Cleaning Roller

SafeCard ID presents a new video demonstrating how to clean the card cleaning roller in the Evolis Dualys 3 ID card printer.

How to clean the card cleaning roller

1. Open the top cover.
2. Remove the print ribbon.
3. Remove the cleaning roller located under where the print ribbon was.
4. Wipe the roller with the wipes from your card cleaning kit. If no kit is available, use warm water and soap.
5. Remove dust and lint from the cleaning roller.
6. Replace the cleaning roller in the printer.
7. Replace the print ribbon.
8. Close the top cover.

Evolis Dualys 3 Printer – Install a Print Ribbon

This video demonstrates how to install a print ribbon in the Evolis Dualys 3 ID card .

How to Install a Print Ribbon in the Evolis Dualys 3 ID Card Printer

1. Open the top cover.
2. Place the ribbon in the printer with the supply side to the right.
3. Close the top cover.

Safe-Card ID Services offers free phone support to our clients, so call 704-535-5200 to speak with one of our technicians.

Evolis Pebble 4 Printer – Cleaning the Printhead

Following is a video demonstrating how to clean the printhead on an Evolis Pebble printer.


To clean the printhead, follow the directions displayed in the above video.

      1. Remove the power plug
      2. Open the top cover
      3. Break the vial in the printhead cleaner and allow the fluid to run to the swab
      4. Run the swab across the printhead.
      5. Close the top cover
      6. Reinstall the power plug
    7. Check for power.

Please call one of our technicians at 704-535-5200 for additional support!

Evolis Pebble 4 – Printing a Test Card

Following is a video from the Safe-Card ID Team that illustrates how to print a test card using an Evolis Pebble 4 ID card printer.

Directions to Print a Test Card

1. Check to make sure that there is a print ribbon and pvc cards in the printer.

2. Power the printer off.

3. Push the printer power button and turn the power back on. Without releasing pressure, continue holding the power button until the light flashes.

4. As you hold the power button in, the printer will pull a PVC card through the printer and print a test card.

5. Keep the test card in a safe place as it will contain specifications about your printer that may be needed for future parts or repair.