Category Archives: Evolis Printer

New Firmware from Evolis

As part of its continuous improvement policy, Evolis has recently released new firmware version 1801 for their main printer lines. Keeping your firmware up-to-date helps ensure that your printer works at peak performance. Often clients with out of date firmware will have trouble with their printer recognizing new ribbons or interacting with their computers. By keeping your firmware current, you can avoid many of these difficulties.

To update your firmware, please visit the Drivers & Support page on the Evolis website. Once there, simply select your printer model and scroll to the firmware downloads section. New firmware is available for the Evolis Primacy (all models), Evolis Zenius, Evolis Avansia, and Evolis Badgy 100 and 200 printers.

Note that we recommend you update your Evolis printer drivers to the latest version as well. The driver update program is located right alongside the firmware update on the Evolis website.

And, for our regular clients, you can always call us for free technical support or assistance in performing these upgrades. You can reach our experts toll-free at +1 888.485.4696, or direct dialing at +1 704.535.5200.

Retransfer vs. Direct-to-Card Printers

Retransfer vs. direct-to-card printers: when considering how you want to produce your highest-grade, professional ID-cards, you must decide between the two. The announcement of Evolis’s Avansia retransfer printer in 2015 raised a key question among many clients: What is the difference between a retransfer printer and a direct-to-card printer?

The short answer? It’s all about how the printer applies your card design to the ID-card. One method first applies the card image to a thin film, and then transfers the complete image onto the card in one pass; the other prints directly onto the surface of the card (I know! I was surprised too! 🙂 ).

Below, we’ve broken this down into 4 sub-questions to compare the two. And we briefly discuss the inner workings of retransfer vs. direct-to-card printers. If you’re more interested in the differences than the inner-workings, feel free to skip the next section.

Retransfer vs. Direct-to-Card Printers: the Methods
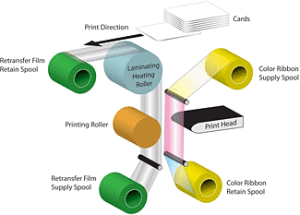
Process Retransfer vs. Direct-to-Card Printers

Retransfer print process image courtesy of Magicard.

With retransfer printers, your card design (images and text) are first printed onto a clear “transfer film”. This is accomplished through a series of passes, one for each color being applied or created. The full, finished card-image is then thermally fused to the card’s surface. The transfer film helps protect the printed card details from abrasion and color fading, due to UV-light sources.

On the other hand, direct-to-card printers place the images and text directly onto the card. With this method, the card and print-ribbon pass over the stationary print-head, sequentially applying yellow, magenta, cyan and black ink (YMCK) to create virtually any color. After applying the color inks, the printer then applies a clear varnish across the full surface of the card, so as to protect the printed image.

What are the differences in results?

By laying the film over the card, a retransfer printer is capable of “over-the-edge” printing that maximizes the card’s surface area. Because the transfer film and applied image can be slightly longer and wider than the card itself, there is no visible margin. If you want a background image that covers the entire card, this is how best to achieve that result. The transfer film also acts as a protective barrier that renders the image slightly more durable.

A direct-to-card printer leaves a very thin border around the edges (only 1mm or so). This “near-to-edge” printing suffices if the card color itself serves as the background color for your ID design, or if full-card coverage is otherwise not required.

HID Global, maker of the Fargo HDP5000, HDPii, HDP5600 & HDP8500 retansfer printers states that retransfer printers create sharper, glossier images (a result of the gloss finish of retransfer films) while the clear varnish overlay applied by direct-to-card printers results in a matte finish. Importantly, the retransfer printing process is more forgiving of slight imperfections in a card’s surface. This is particularly beneficial if you print proximity access cards or smart-cards, as there is often a slight “dimple” on the card surface in-line with the internal electronic components. The retransfer method can also mask minor surface scratches, and even fingerprints.

Direct-to-card printers might not correctly render images over such surface items, resulting in imperfect color(s), or leaving small areas unprinted. Note that you can prevent some causes of these card-surface and print-quality issues by taking measures to protect your unused cards:

  • Handle cards only by their edges to prevent fingerprints from affecting printable surfaces.
  • Store unused cards in a closed container, and in a clean and dry location to avoid dust and surface damage.

What are the similarities?

Both print processes involve application of a full-card image, via thermal print-ribbons to the card surface – the retransfer printer just includes an additional step due to the use of retransfer film.

Both are designed to create durable cards. But all cards are subject to wear. To get the maximum life out of your cards, employ composite cards, add a lamination module to the printer (optional on certain printers), or wear finished cards within protective badge holders.

What materials do they require?

Both printer types require the use of color or monochrome print-ribbons. Retransfer printers additionally require clear retransfer film, on which the card design is first printed and then fused to the card. Typical ribbon designations for retransfer printers include YMCK & YMCKK.

Rather than using a retransfer film, direct-to-card printers use ribbons with an integrated varnish-overlay. This clear vanish overlay is applied as the last step in the print process, to protect the image from wear and fading in sunlight. Typical DTC ribbon designations are: KO, YMCKO, & YMCKOK.

The Bottom Line

Deciding between retransfer and direct-to-card printers really comes down to your use case. The retransfer printer helps you maximize your card’s surface, is more forgiving of imperfections, and is generally regarded as producing a better, glossier image. The direct-to-card printer removes the need for retransfer film and applies your design directly to the card, eliminating a step. Finally, retransfer printers and their supplies generally cost more than direct-to-card printers and their related supplies, so your budget will play a role in deciding which is right for your organization.

At the end of the day, which printer you need is always going to come down to your specific requirements. Hopefully this blog entry will help you think through that process.

Need more info?

Questions? Concerns? Not sure what printer is best for you? Call our ID-card experts toll-free at +1-888-485-4696 (US & Canada), or +1-704-535-5200 (elsewhere) for a free consulation. We are always glad to help!

Evolis Printer – Install an Evolis USB Printer on a Mac

Following are the steps to install an Evolis USB printer on a Mac running OS X version 10.4 through version 10.11.

  1. Prior to starting the installation, make sure you have Administrator rights.
  2. Plug the printer into an open USB port on the Mac and power-on the printer.
  3. Ensure that cards and ribbon are loaded in the printer, and that only the power-light is illuminated following the power-up sequence.
  4. Go to the Evolis Drivers & Support page, then click through to your specific printer model from the available choices.
  5. Scroll down the printer-specific downloads page to locate the Mac OS X driver, and download it to your desktop. Run the setup installation and follow the instructions during the installation process.
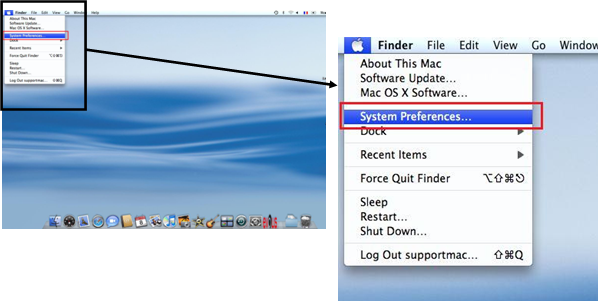
  6. Open the “Apple Menu”, then select System Preferences.Mac Installation
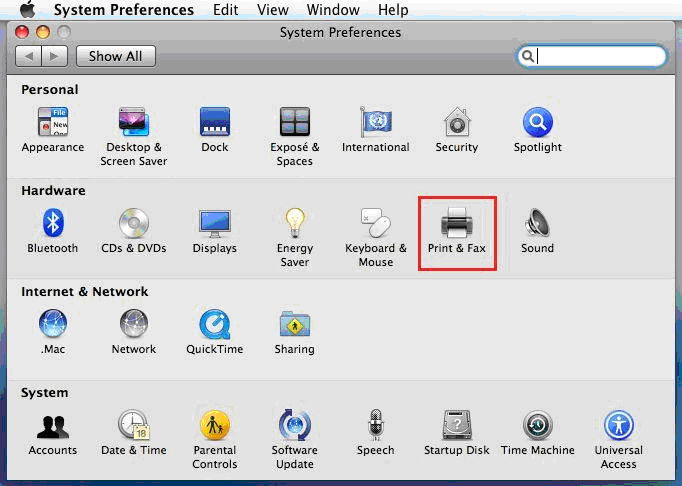
  7. Open Printers and Scanners.Mac Installation
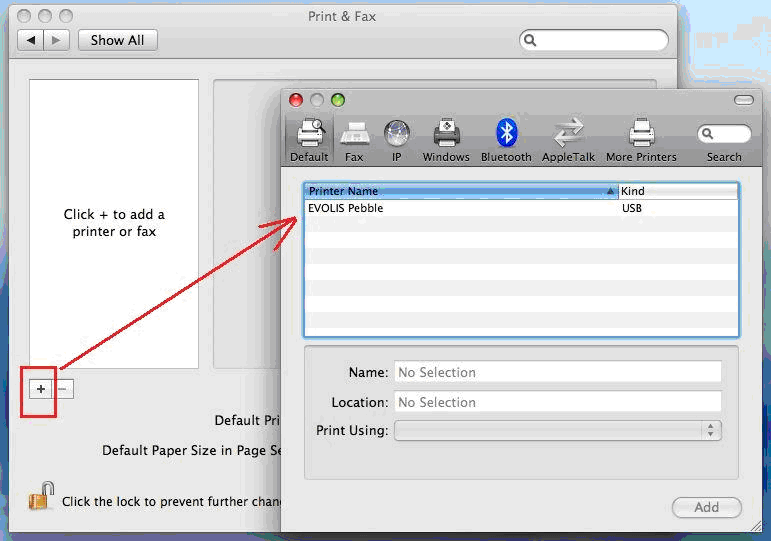
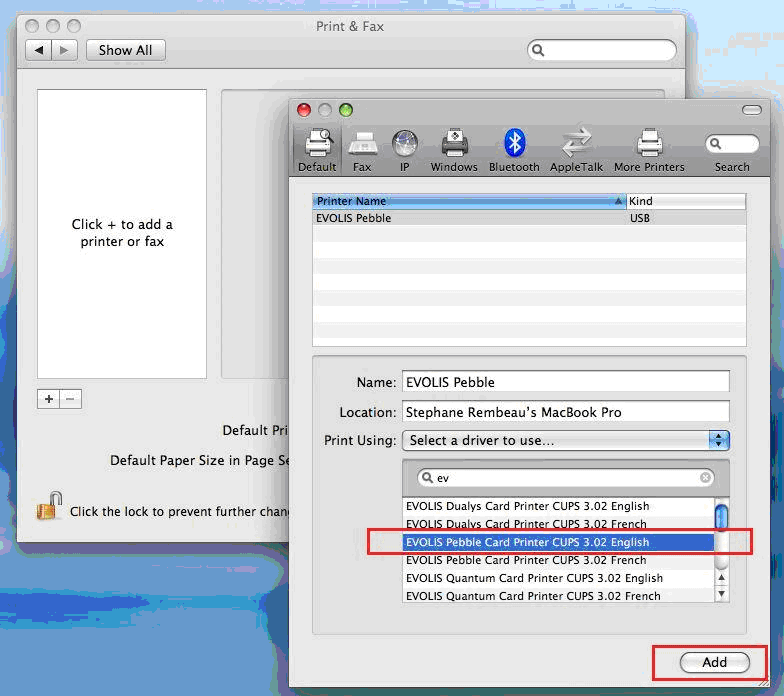
  8.   Click on the + to add a printer. In the resultant pop-up window, your Evolis printer will already be detected and listed. Select the Evolis printer.Mac Installation
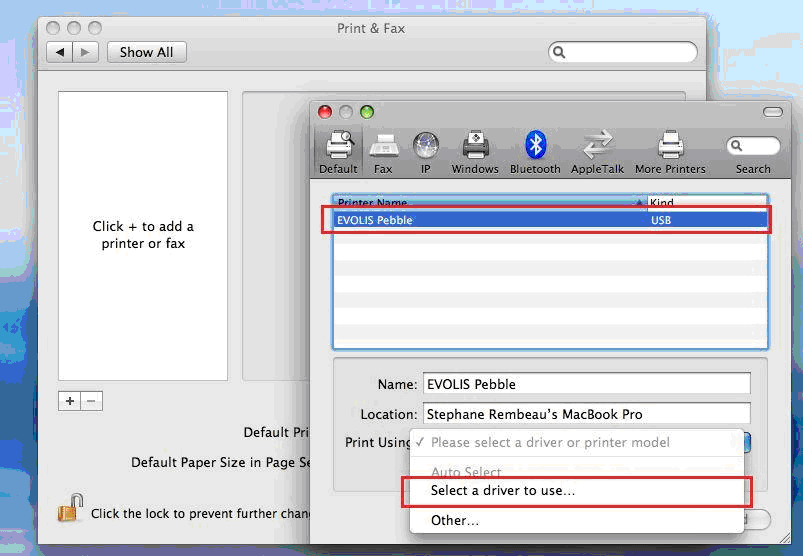
  9. In the “Use” box, choose “Select Software”Mac Installation
  10. In the drop-down menu, select the Evolis driver and the language you need, then click on “Add” to validate your choice.Mac Installation
  11.   The driver is now ready to be used, and you are ready to begin printing cards.

Congratulations! You’ve now completed the steps required to install an Evolis USB printer on a Mac, and are ready to go!

Other tips:

In your badge-printing software, ensure that the correct driver is selected for the printer, and also check the paper-size settings. Badge creation programs will usually offer “CR80” or “Card” as a standard size. Go to Printer Features to access any Evolis print-driver properties and adjust as necessary.

Need more info?

For more information about Evolis printers, review our blog for other Evolis printer tips and support posts, or call our ID experts toll-free at +1 888.485.4696 (from US & Canada), or +1 704.535.5200 (from other locations)

Evolis Card Printers – Card Feed Problems

This tech-tip is intended to help resolve card feed problems with Evolis Tattoo2, Evolis Pebble4 and Evolis Dualys3 plastic card printers. Some of the remedies may also apply to other Evolis printers, and those from other manufacturers.

Evolis Tattoo2, Pebble4, and Dualys3 - Card Feed Problems

Plastic card printers may have instances when they will not feed cards consistently from their card input hoppers. This can occur when there are just a few cards in the hopper. But it is more common when their card hoppers are full.

Usually, the cause is not with the printer itself. Rather, the problem most often is the result of the cards being difficult to separate.

Card Feed Problems – Remedies:

Before attempting remedies, remember to handle blank plastic cards carefully, and only by their edges. This will prevent the transfer of lint, dust, and residual body-oils from your fingertips. The presence of any of these contaminants can result in poor print-quality.

  1. Remove the cards from the input hopper and fan out or shuffle them to break any static-bond, and to dissipate natural static charge
  2. Check the card thickness gauge and set just slightly more than your blank cards’ thickness. For example, if the cards are 30 mils thick, adjust approximately 32 or 33 mils.
  3. Clean the card intake roller with alcohol wipes and/or an IPA alcohol cleaning card. Both are included in the Evolis #A5021 UltraClean printer cleaning kit.
  4. Ensure the cards are stacked properly in the card hopper, and that there are no obstructions that might prevent the printer from extracting them.

Need further assistance or more info?

Safe-Card ID Services offers our clients free telephone-based tech support for the life of all printers sold. For additional assistance, or other information about all Evolis printers, please contact our ID-card experts toll-free at +1 888.485.4696 (US & Canada), or +1 704.535.5200 (elsewhere).

Based in Angers, France, Evolis is a leading global manufacturer of quality plastic card printers.

Clean Your Evolis Primacy using the Print Center

Why Clean Your Evolis Primacy?

To maintain warranty coverage for your Evolis printhead, Evolis requires that you clean your Evolis Primacy at certain intervals. The printer automatically tracks cleaning cycles and the intervals between them. However, these cleanings must follow the proper procedure for the printer to record the event.

Evolis requires two types of cleanings performed at the indicated intervals:

  • A “regular” cleaning every 1,000 cards, using the Evolis Regular Cleaning Kit:
    1. Run a “sticky” cleaning card through the printer,
    2. Manually clean the print-head with a special IPA alcohol saturated, foam-tipped cleaning swab,
    3. Wipe down all card-transport rollers with an IPA alcohol wipe.
  • An “advanced” cleaning every 5,000 cards, using the Evolis Advanced Cleaning Kit:
    1. Run a special IPA alcohol soaked “T-card” through the printer,
    2. Perform the “regular” cleaning, described above.

While not required, we recommend removing and cleaning the built-in cleaning roller each time that you change the ribbon.

Recommended Procedure to Clean Your Evolis Primacy:

It is best practice to use the cleaning wizard integrated within the Evolis Print Center utility program. Using this program helps the printer to recognize and log your cleanings. It will guide you through completing the seven steps listed below:

  1. Prepare to clean your Evolis Primacy by ensuring that your printer is:
    • connected to the PC that you normally use it with,
    • powered on and “ready”,
    • not waiting on any print-jobs in the printer queue (via Windows’s “Devices and Printers” menu).
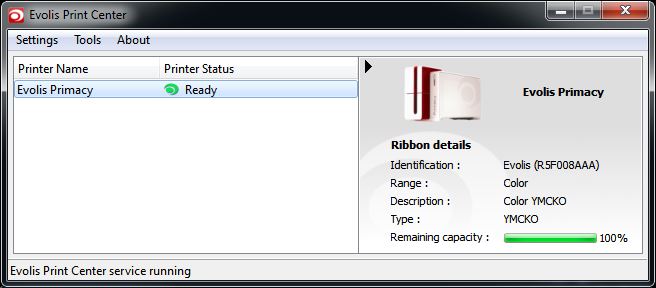
  2. When you have prepared your printer, open the Evolis Print Center utility program. This action should pull up a status window similar to the one in the image below:  Clean Your Evolis Primacy, Step 2

    Troubleshooting: If the printer status is “Offline”, verify that the printer is firmly plugged in and that it is powered on. If the printer status is “Not Supervised by Evolis Print Center”, right-click on the Printer Name (i.e., “Evolis Primacy”), and select “Enable Supervision”.

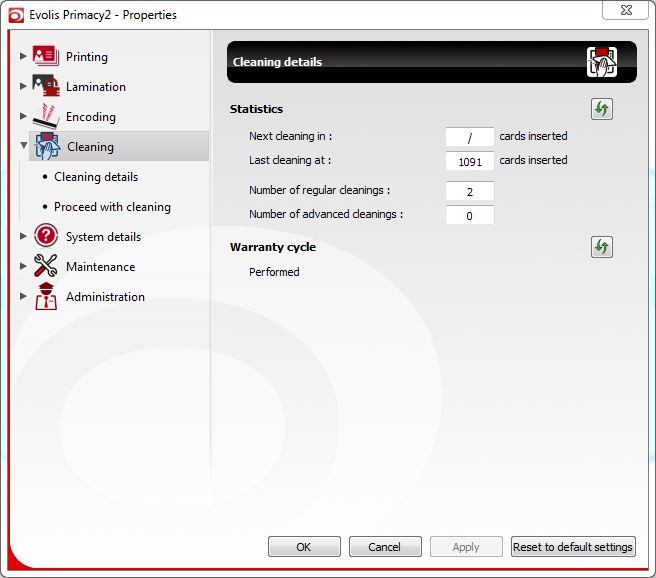
  3. Once the printer status is “Ready”, right-click on the printer name (“Evolis Primacy”) and select “Properties”. Doing so launches a second window that looks like the one below where we have pre-selected the cleaning tab.Clean Your Evolis Primacy, Step 3

    **Note: this tab provides statistics regarding the next required cleaning, the last cleaning, and regular and advanced cleanings performed since new. It also displays whether the warranty remains in force thanks to keeping the cleaning schedule.

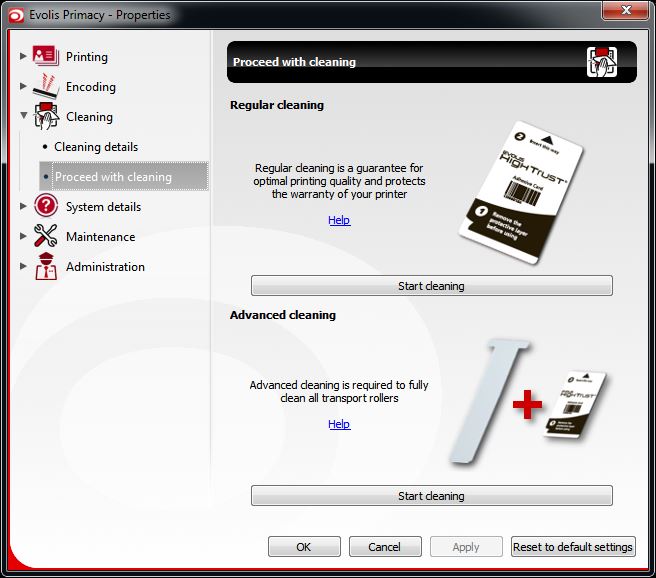
  4. To view your cleaning options, click on “Proceed with Cleaning” under the cleaning heading in the left menu bar:Clean Your Evolis Primacy, Step 4
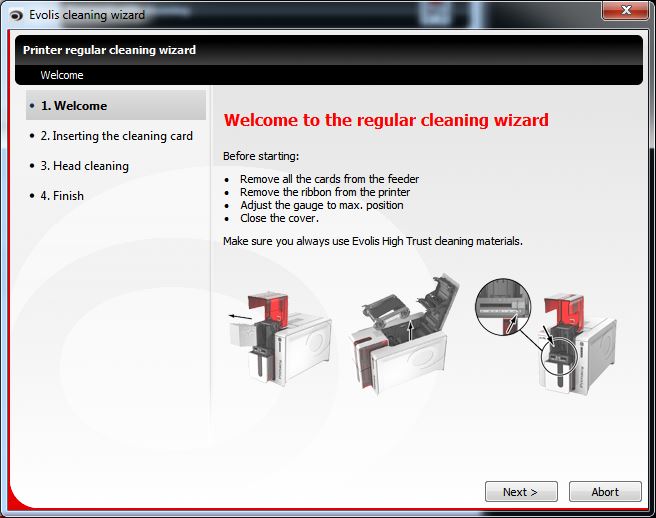
  5. Click the “Start cleaning” button under the correct heading. The cleaning wizard will then launch, as in this example of the regular cleaning process:Clean Your Evolis Primacy, Step 5
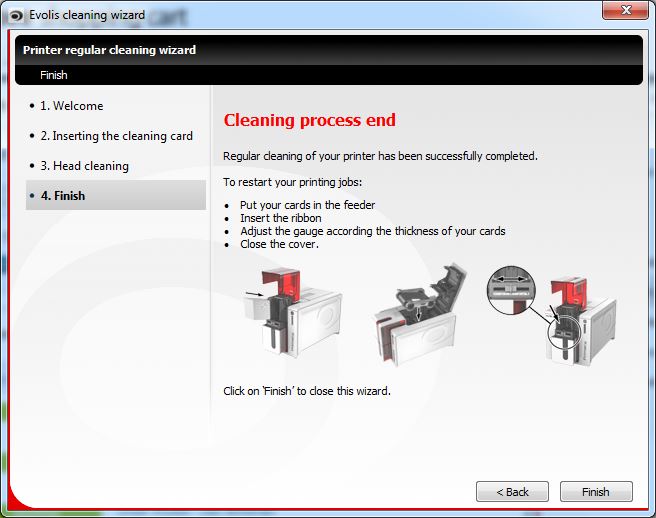
  6. Continue through the cleaning process by following the instructions on each page of the Cleaning Wizard then clicking the “Next >” button to move on to the next step. Once you have completed all of the cleaning steps, you will see with the “Finish” screen shown below. Clicking the “Finish” button on this screen will return you to the main properties menu shown in Step 3.
    Clean Your Evolis Primacy, Step 6

    **Note: If you have executed the Advanced Cleaning process, return to the “Proceed with Cleaning” section shown in Step 4. Then follow the advanced cleaning with the Regular Cleaning process.

  7. Make sure that the printer logged the cleaning properly by returning to the “Cleaning” tab shown in Step 3. While there, verify that the value in “Next cleaning in:” is 1000.

Restock your printer

To finish, reload the printer with cards and ribbon then reset the card thickness gauge to the appropriate setting for your cards. We recommend a setting slightly above the actual card thickness so, for a 30 mil card, a setting of 32-33 is most appropriate.

As always, our technicians offer free service to our clients by phone at +1 888.485.4696 (toll-free US & Canada), or +1 704.535.5200.

Value of High-Quality Consumables for ID Card Printers

Always use high-quality consumables, purchased from authorized dealers in your ID card printer. These supplies provide the best life and results from your machine. Safe-Card ID Services is one such dealer, but there are lots out there; find a dealer you trust!

But I saw cheaper consumables online…

Less reputable dealers may offer cards and ribbons that are “compatible” with your printer but are not certified. While you may find that they offer these at a discount, these savings may be an illusion. Recently, a local client ruined multiple print-heads by using sub-standard cards. Not only was this an inconvenience that interrupted their card production, it was costly. Printer manufacturers’ warranties do not cover print-head damage from poor-quality or non-genuine consumables.

What problems might low-quality consumables have?

Poor-quality cards may have foreign objects (dirt, dust, hair, and plastic particles), irregular sizing and thickness, and jagged-cut edges. In the best-case scenario, using these cards will require more frequent printer cleaning (to remove those foreign objects!). The worst-case scenario results in physical damage to the printer, specifically the expensive print-head.

Poor-quality ribbons may not be compatible with RFID sensors or printer firmware updates, leading to “no ribbon” or “unknown ribbon” errors, thus preventing their use. Non-genuine ribbons are often made with sub-standard materials. Use of these materials can lead to low-quality images, rendering of colors inconsistently, and ribbons tearing and sticking to card surfaces, all of which can also cause damage to the print-head.

Why are high-quality consumables such a big deal?

All printer manufacturers stipulate that the use of non-branded or low-quality materials can void printer and print-head warranties. While great online deals can be tempting, it is important to make sure that the materials are of high quality–both to preserve your device warranty and to ensure the best possible output.

The bottom line: be sure to inspect materials before using them. A broken printer costs more to replace or repair than you could ever save with aftermarket or “gray-market” supplies. Find a trustworthy, authorized dealer for your printer consumables and rest assured that your printer investment will be protected.

Evolis Primacy – How to Do a Routine Printer Cleaning

The following video provided by Evolis provides manufacturer instructions illustrating how to complete a routine printer cleaning with a cleaning card.

1. Open the printer lid on the top of the printer.
2. Remove the print ribbon.
3. Close the lid.
4. Open the card input hopper.
5. Remove all blank cards.
6. Shift the card thickness gauge to “MAX”.
7. Remove the adhesive strip from the cleaning card.
8. Place the cleaning card in the input hopper and leave the hopper door open.
9. Press the power button twice.
10. The card will be automatically cycled through the printer and ejected into the output hopper.
11. Remove the card from the output hopper and close the card output hopper.
12. Open the printer lid.
13. Replace the print ribbon and close the lid.
14. Return unused cards to the input hopper.
15. Return the thickness gauge to its correct setting and close the hopper door.

For information about the Evolis Primacy printer, please contact our ID card experts at +1 888.485.4696.

New Evolis Drivers for Mac and Windows

Evolis has announced that Evolis Premium Suite (for Zenius, Primacy, and Elypso) and Badgy Premium Suite (for Badgy 100 and Badgy 200) are available for both Mac OSX (version 6.2.1.65) and Windows (version 6.18.0.688).

Updating your driver allows you to take advantage of the latest improvements and get the most out of your Evolis printer. Additional information about Evolis firmware, drivers, and driver history can be found here.

As a reminder, you should always update your firmware with your drivers. You can do that at the link provided above.

As always, our experts are ready to help with any problems or questions and can be reached at +1 704-535-5200 or +1 888-485-4696.

New Linux Drivers for Evolis Printers

Linux Penguin

Evolis released new Linux drivers in December 2014 for the Zenius, Primacy, Quantum 1 & 2, Dualys 1/2/3, Tattoo 1 & 2, Pebble 2/3/4, and Securion printers. These drivers are now available with RPB or DEB installation packages for the 64 and 32 bit versions.

The new drivers for all of the printers listed above (as well as drivers for other operating systems) can be downloaded here. As a reminder, we recommend keeping your drivers up-to-date (and that you update your firmware at the same time!) to ensure that your printer operates at maximum efficiency.

As always, our experts are ready to help with any problems or questions and can be reached at +1-704-535-5200 or +1-888-485-4696.