Category Archives: ID Software & Visitor Management Software

All about differing brands and editions of software made especially for the design and printing of ID cards, employee badges, loyalty cards, membership cards, and more!

ID Works Software – Trial Download

ID Works Software v6.5 – Free Trial Evaluation

Datacard invites you to test drive their ID Works® identification software, to simply and securely create high-quality ID-cards. This software will facilitate card design and production, as well as required reports. Easy to use, ID Works® offers many powerful features. And, because it has a flexible, modular design, you can select the edition containing just the right features to best meet your needs.

ID Works – Available Editions:

ID Works

Click to launch download page

ID Works® is available in four separate editions, suited for use by small organizations through multi-national corporations, or in large government applications.

These editions are:

  • ID Works® Intro
  • ID Works® Basic
  • ID Works® Standard
  • ID Works® Enterprise

ID Works Add-on Modules:

Additionally, ID Works offers add-on modules to meet specific requirements of many organizations, including:

Datacard® Tru™ Signature Solution/Software
To easily capture signatures electronically for application to photo ID cards.

Datacard® ID Works® Visitor Manager Software
Register and monitor visitors automatically just by scanning a government-issued credential.

Datacard® ID Works® Designer Software
Design professional-looking cards and reports from scratch, or choose from a library of templates to get started.

Datacard® ID Works® Production Software
Integrate existing databases to capture text and images, and eliminate redundant data-entry and related typographical errors.

Datacard® ID Works® SDK Software
Customize ID Works® software better meet unique requirements with an easy-to-use software-development kit.

Smart Card Designer Tool
Create and smart card designs quickly with this wizard-like tool, saving time and frustration.

Capture Server Software
Integrate Datacard data-capture solutions with your enrollment software.

Print Server Software
Create device-specific printer and encoder plug-ins to use with ID Works software, maximizing platform flexibility.

Download your evaluation copy of Datacard ID Works® identification software by clicking on the ID Works logo above, or with THIS LINK.

Need more info?

For additional information about Datacard’s ID Works, and other card design and printing software, check our ID software page, plus our on-line store. Of course, if you would like personalized service in selecting the best software for your organization, contact our ID-card experts at +1 888.485.4696 (US & Canada), or +1 704.535.5200 (elsewhere).


ID Flow Software – Working with Images

ID Flow Software is capable of designing quality, custom ID badges. This video illustrates how to work with images when using the software to design a card.


How to Insert Images Into your ID Card Template

Insert a Fixed Image from a File.

Click the colored image tool.

With your mouse, draw the approximate image area.

Select fixed image from the file.

Then, browse to select your image. More than 20 image file types are supported.

Click the select button.

Click OK.

Add A Background to Your Card

Double click off to the side of your template or click the document properties icon.

Check background image. 

Then, browse and select the file.

 or

Import the background image as a seperate layer to use blending effects.

Click show layers.

Click the plus button to add another layer.

Then, click the down arrow to move the layer under other layers.  Design layers stack like sheets of paper.

Click the image tool and draw an image box.

Select the fixed image from file.

Browse and select the image  file.

On the properties tab, uncheck the maintain aspect ratio.

Click ok.

Use the stretching tool to stretch the image to the borders of the template.

The opacity of the image can be controlled in the layers dialog.

Variable Image from the Database

Hold the shift key down while you draw the image area and you will draw a perfect square.

Select variable image from the database.

Select your image field. In this instance it is photo.

Select the live data checkbox to see the template with the database record.

If the image background is reasonably consistent, it can be removed.

Double click on the image.

On the properties tab, check remove background and give the feature a tolerance.  About 10 usualy works well.

Background removal works best with images are take with a blue or green screen backdrop.

Hold the shift key down to resize while retaining aspect.

Alignment tools help you place your objects

Repeat the background removal process to remove the background from the logo.

Alternatively, variable images may be pulled from a file. Select variable image from file or internet.

Click insert folder path and insert folder.  Insert the database field or fields by which the image is named. In this case the image was named by first and last name.

Lastly, be sure to include the images file extension.

Images Obtained at Print Time.

Draw the image place holder.

Select image captured or  selected at print time.

To preconfigure a capture device, select advanced options and select the camera or capture device.

The placeholder will appear on the template.  You will be prompted to take a photo during the print process.

The photo will not be stored anywhere and will not able to be reprinted.

Additional ID Flow Training Videos:
ID Flow Software- Text Formatting
ID Flow Software – Working with Records
ID Flow Software- Adding Bar Codes and Magnetic Stripes
ID Flow Software- Working with Images

Safe-Card ID provides photo ID card systems, ID card printers, ID card software, PVC cards and ID badge holders and other ID card supplies. Contact us at 888-485-4696. We look forward to hearing from you soon.

ID Flow Software – Adding Bar Codes and Magnetic Stripes

Adding Bar Codes and Magnetic Stripes through the ID Flow Software

ID Flow Software provides the capabilities of adding bar codes and encoding magnetic stripes on custom printed identification cards. The following video demonstrates 1D and 2D bar coding as well as how to encode a magentic stripe through the card software.

The above video describes how to insert and format barcodes and magnetic stripes:

1D Barcodes
1. Click on the 1D barcode tool.
2. Draw the bar code area on the card surface displayed on the monitor with your mouse.
3. The properties interface will automatically open allowing you to add data, select your bar code type, select readable text and select specific reader specifications.

2D Barcodes
1. Click on the 2D barcode tool.
2. Place and size the bar code area on the card surface with your mouse.
3. The properties interface will open allowing you to add data, select the bar code type, select readable text and select specific reader specifications.

Encoding magnetic stripes
1. Click on the magnetic stripe.
2. Enable the tracks needed and add data to each.
3. View the backside of the card to see a rendering.
4. Use a printer with a magnetic stripe encoding module and cards with a mag stripe to encode the cards

Additional ID Flow Training Videos:
ID Flow Software- Text Formatting
ID Flow Software – Working with Records
ID Flow Software- Working with Images

For additional information about ID Flow or other ID card software products, contact our software experts at 888-485-4696.

ID Flow Software – Working with Records

Learn about Working with Records in ID Flow Software

The video above walks step by step through a number of different database, record and picture adjustments that can be made with ID Flow software. This five plus minute video is packed with some of the following information:

Change field order and field properties (.15)
Fields can be moved with a mouse (.29)
How to change placement of the caption (.36)
How to change filed width (.45)
How to format text (1.04)
How to create drop down lists (1.20)
Photo information (1.43)
Advanced searches and sorting (3.17)
Create and clear filters (3.30)
Spreadsheet viewing (3.56)
Import/Export information (4.14)

For additional information about ID Flow or other ID card software products, contact our software experts at 888-485-4696.

How To Network Jolly Products

Instructions to network Jolly software products are as follows:

Moving the Company Source (the central networking file) to a network server

1. Load the software on a workstation
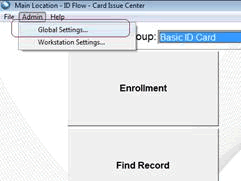
2. In ID Flow Card Issue Center, click Global Settings

network iinformation

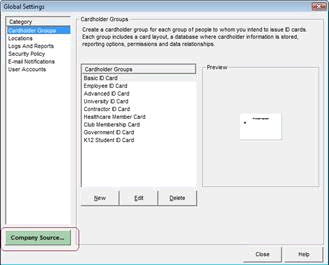
3. Click on Company Source

network iinformation

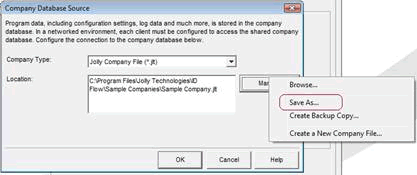
4. Click “Manage” then “Save As” and save the company file to a Server Location

network iinformation

5. To network a second workstation, go through the same steps and at the final step, select “Browse” instead of “Save As” and browse to the Company.jlt file that you moved in the previous step. The software is now networked.

Moving Cardholder Databases to a Network Server

1. By default the sample company database is stored on:
C:/program files/jolly technologies/id flow/sample databases/sample database.mdb

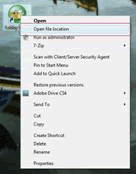
In Windows 7 and Vista the shortcut to get there is to right click on the ID Flow or Lobby Track Icon and select “Open File Location” in Windows XP, right click on the Icon, go to properties, the click file location:

network iinformation

2. Copy the “sample company.mdb” and paste it to the network server location

3. Click the “Properties” button to get to the Cardholder Group Properties dialog
(this is a shortcut, you can also get there by clicking edit on the highlighted cardholder group in Global Settings)

network iinformation

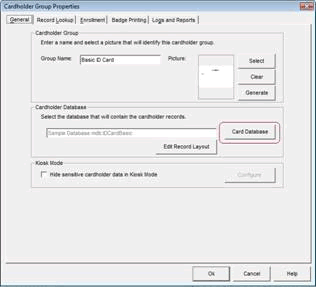
4. Click on the “Card Database” button

network iinformation

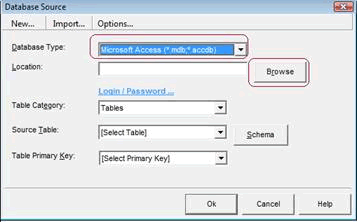
5. Change the database type to Microsoft Access and then browse to the .mdb file you placed on the server

network iinformation

6. On the same dialog above, you will need to select the source table for the cardholder group and then select ID Number for the primary key.

7. If there are more than one cardholder groups the customer is using, repeat steps 1-6 in this section for each cardholder group.

For more Information about ID Flow and Lobby Track, contact our software experts at 888-485-4696.

Asure ID 2009 Software – Using SQL as the Native Database

Setting up Asure 2009 to use SQL as the Native database:

The first thing that needs to be done is have the SQL Database Administrator create a database instance for Asure 2009 to use. The security setting for the database needs to be set by the SQL Database Administrator. They need to grant full read/write privileges to the database instance.

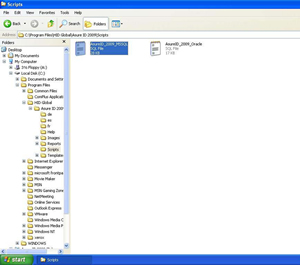
On that instance the SQL Database Administrator needs to run the table creation script. The script can be found at the location shown in the following screen shot:

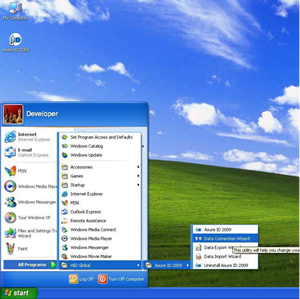
Once the script has been run to create the tables Asure 2009 can now be connected to the database. Under the start menu, choose the “Data Connection Wizard” as shown below:

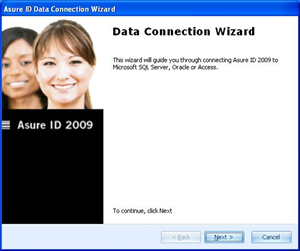
This will start the wizard to connect Asure 2009 to the SQL Database.

Below is the first screen for the wizard:

Click next to continue setting up the customer database configuration for Asure 2009.

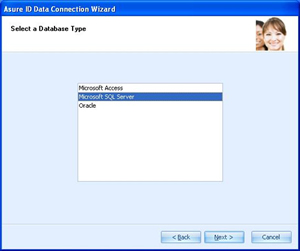
The next screenshot is the wizard asking what type of custom database Asure 2009 will be connected to:

In this example choose “Microsoft SQL Server” and click “Next”.

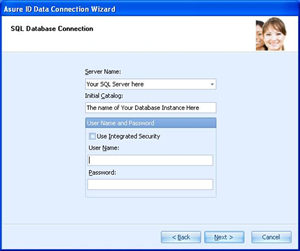
The following screen shot is the actual set up screen of the wizard. This is the general data connect window for SQL Server:

Under “Server Name” the name of the SQL Server needs to be entered. Then under “Initial Catalog” type in the name of the Database Instance that the SQL Database Administrator set up for Asure 2009 to use. The “User Name and Password” should be provided to you by your SQL Database Admin. These can either be specified user names and passwords or it can be set up to “Use Integrated Security”. This means that who ever logged on to the computer has access to the database.

Once it is all filled out, click “Next”.

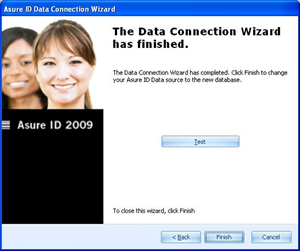
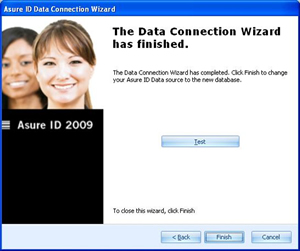
The wizard is now complete.

You can click the “Test” button to test the connection to the SQL Database.

Once you have verified the connection click “OK”.

The following screen will be back up again:

Click “Finish” to exit the wizard.
The log in for Asure 2009 now that it is connected to the SQL Database is:
User Name: admin
Password: admin

Safe-Card ID provides ID card printers and ID card software including Asure ID Software. Contact our ID card experts at 888-485-4696 for purchasing information.

Visitor Management Software

Visitor Management Software – Lobby Track

For excellent visitor and member management software, look no further than Lobby Track 4. The software registers visitors and members. The software will issue permanent and temporary badges as well as track time and attendance. Various activities can be monitored through this software.

SCREEN SHOTS

For detailed information about Lobby Track Software, you can view screen shots from the software on our site.

DEMO VIDEOS

View Demos of the Lobby Track Software

A FREE TRIAL VERSION AVAILABLE

Download a free trial version of the Lobby Track Software

For additional information about visitor id management systems or photo id card printer systems, contact our id card experts at 888-485-4696.

ID Flow Software Screen Shots

ID Flow is premier software for card design, production and data management. The software provides a method to design and print id badges on plastic or paper. Bar codes, biometrics and mag stripes can be added to the cards. With the software, connect and manage the cardholder database.

Following are screen shots from the software:

ID Card Designer

Lobby Track

Card Issue Center

Lobby Track

Cardholder Record Lookup

Lobby Track

Report Center

Lobby Track

Record Center

Lobby Track

For brochures and specific information about Lobby Track or ID Flow software, contact our id card experts at 888-485-4696.

Lobby Track Visitor Management Screen Shots

Lobby Track 4 is premier software for visitor and member management. The software registers visitors and members. The software will issue permanent and temporary badges as well as track time and attendance. The software can be used to monitor many activites throughout the organization.

Following are screen shots from the software:

Main Menu

Lobby Track

Visitor Check In

Lobby Track

Successful Visitor Check In

Lobby Track

Record Center

Lobby Track

Charts in the Record Center

Lobby Track

ID Flow Four Badge Designer

Lobby Track

For brochures and specific information about Lobby Track or ID Flow software, contact our id card experts at 888-485-4696.