Author Archives: Safe-Card ID Team

Clean Your Evolis Primacy using the Print Center

Why Clean Your Evolis Primacy?

To maintain warranty coverage for your Evolis printhead, Evolis requires that you clean your Evolis Primacy at certain intervals. The printer automatically tracks cleaning cycles and the intervals between them. However, these cleanings must follow the proper procedure for the printer to record the event.

Evolis requires two types of cleanings performed at the indicated intervals:

  • A “regular” cleaning every 1,000 cards, using the Evolis Regular Cleaning Kit:
    1. Run a “sticky” cleaning card through the printer,
    2. Manually clean the print-head with a special IPA alcohol saturated, foam-tipped cleaning swab,
    3. Wipe down all card-transport rollers with an IPA alcohol wipe.
  • An “advanced” cleaning every 5,000 cards, using the Evolis Advanced Cleaning Kit:
    1. Run a special IPA alcohol soaked “T-card” through the printer,
    2. Perform the “regular” cleaning, described above.

While not required, we recommend removing and cleaning the built-in cleaning roller each time that you change the ribbon.

Recommended Procedure to Clean Your Evolis Primacy:

It is best practice to use the cleaning wizard integrated within the Evolis Print Center utility program. Using this program helps the printer to recognize and log your cleanings. It will guide you through completing the seven steps listed below:

  1. Prepare to clean your Evolis Primacy by ensuring that your printer is:
    • connected to the PC that you normally use it with,
    • powered on and “ready”,
    • not waiting on any print-jobs in the printer queue (via Windows’s “Devices and Printers” menu).
  2. When you have prepared your printer, open the Evolis Print Center utility program. This action should pull up a status window similar to the one in the image below:  Clean Your Evolis Primacy, Step 2
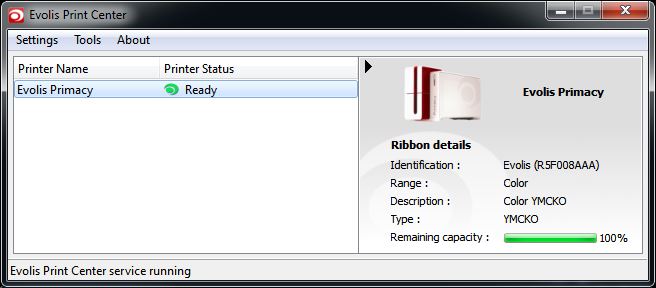
    Troubleshooting: If the printer status is “Offline”, verify that the printer is firmly plugged in and that it is powered on. If the printer status is “Not Supervised by Evolis Print Center”, right-click on the Printer Name (i.e., “Evolis Primacy”), and select “Enable Supervision”.

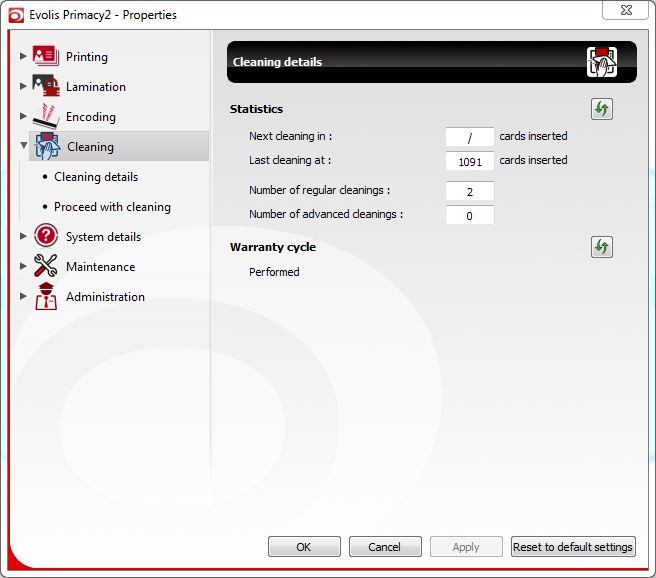
  3. Once the printer status is “Ready”, right-click on the printer name (“Evolis Primacy”) and select “Properties”. Doing so launches a second window that looks like the one below where we have pre-selected the cleaning tab.Clean Your Evolis Primacy, Step 3

    **Note: this tab provides statistics regarding the next required cleaning, the last cleaning, and regular and advanced cleanings performed since new. It also displays whether the warranty remains in force thanks to keeping the cleaning schedule.

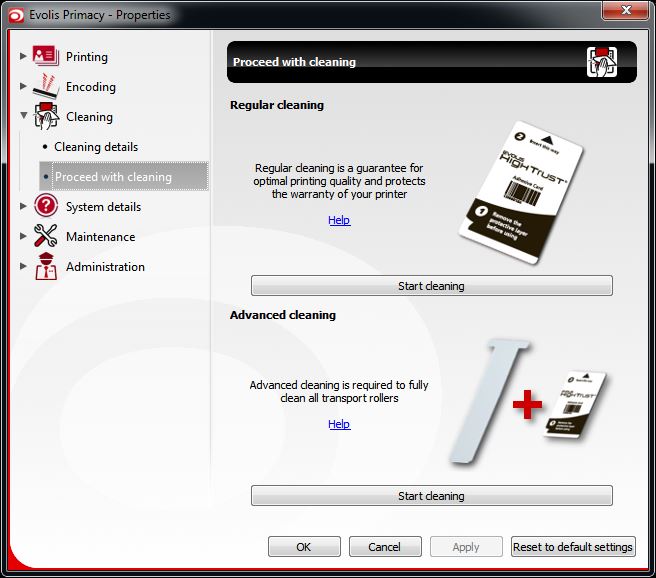
  4. To view your cleaning options, click on “Proceed with Cleaning” under the cleaning heading in the left menu bar:Clean Your Evolis Primacy, Step 4
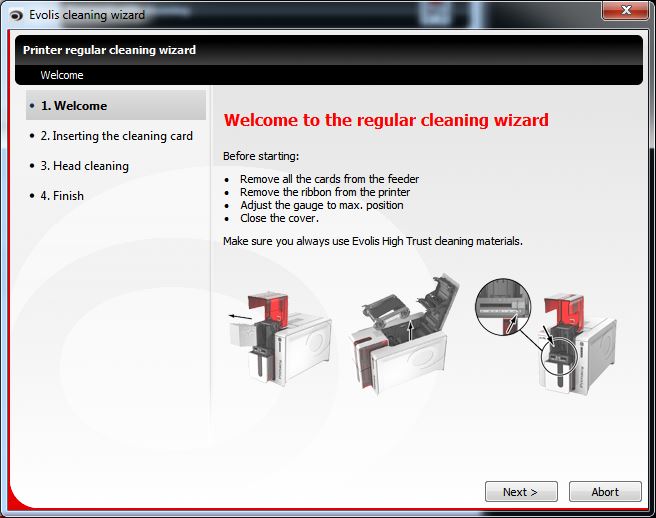
  5. Click the “Start cleaning” button under the correct heading. The cleaning wizard will then launch, as in this example of the regular cleaning process:Clean Your Evolis Primacy, Step 5
  6. Continue through the cleaning process by following the instructions on each page of the Cleaning Wizard then clicking the “Next >” button to move on to the next step. Once you have completed all of the cleaning steps, you will see with the “Finish” screen shown below. Clicking the “Finish” button on this screen will return you to the main properties menu shown in Step 3.
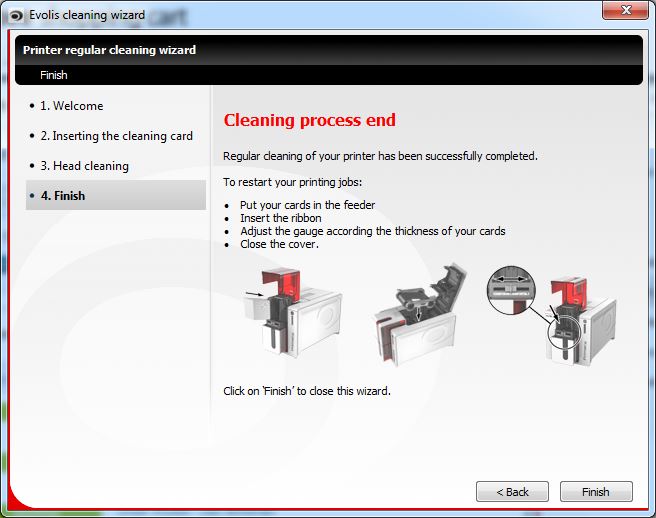
    Clean Your Evolis Primacy, Step 6

    **Note: If you have executed the Advanced Cleaning process, return to the “Proceed with Cleaning” section shown in Step 4. Then follow the advanced cleaning with the Regular Cleaning process.

  7. Make sure that the printer logged the cleaning properly by returning to the “Cleaning” tab shown in Step 3. While there, verify that the value in “Next cleaning in:” is 1000.

Restock your printer

To finish, reload the printer with cards and ribbon then reset the card thickness gauge to the appropriate setting for your cards. We recommend a setting slightly above the actual card thickness so, for a 30 mil card, a setting of 32-33 is most appropriate.

As always, our technicians offer free service to our clients by phone at +1 888.485.4696 (toll-free US & Canada), or +1 704.535.5200.

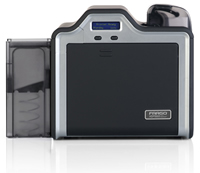
How to Clean a Fargo HDP5000 Retransfer Printer

HID Global has provided a video guide on how to clean a Fargo HDP5000 printer. In it, you will see the contents of the cleaning kit as well as how to run the cleaning process. To clean your HDP5000, you will need a 089200 cleaning kit, your computer, and the printer. Before beginning any cleaning process, remove the retransfer film, print film, and card input hopper.

We recommend that you run the basic cleaning process every 1000 cards in order to keep your printer in optimal working condition:

  1. Open the cleaning kit and remove the adhesive backed card.
  2. Remove the paper backing and place the card at the entrance to the printer input feed.
  3. In your PC’s start menu, open “Devices and Printers.”
  4. Right click on the HDP5000 and choose “Printing preferences.”
  5. Within this window, click the “Toolbox” button on the bottom left, then open the “Clean Printer” tab.
  6. Review the instructions provided to make sure that you are prepared to run the cleaning process, then click the “Clean” button at the bottom of the window.

Less frequently (we recommend every 3000 cards), run the alcohol cleaning card:

  1. Open the card and insert it into the input hopper.
  2. Hold the card in place and press the forward button for 10 seconds.
  3. Continue to hold the card and press the back button for 10 seconds.
  4. Feed the card through the printer by pressing the forward button until the card exits the printer.

To clean the print-head (also every 3000 cards), we recommend completing this process with the alcohol cleaning process detailed above:

  1. Disconnect the printer power supply.
  2. Open the print-head cleaning swab.
  3. Open the front panel of the printer.
  4. Remove the ribbon.
  5. Squeeze to saturate the tip of the cleaning swab.
  6. Firmly wipe across the surface of the print-head.

After finishing any cleaning process, replace the ribbon and retransfer film and close the front panel. Also, don’t forget to replace the card input hopper.
To clean the outside of the printer, use the cleaning pad provided in the cleaning kit. Additionally, each new film cartridge comes with a cleaning roller, which is inserted at the input feed. We recommend changing that roller every time you change the film in order to keep your printer at its cleanest.

As always, if you have any questions or need any assistance, please do not hesitate to contact our experts at +1 704.535.5200 or +1 888.485.4696.

What is that fine white line on my ID card?

The Fine White Line

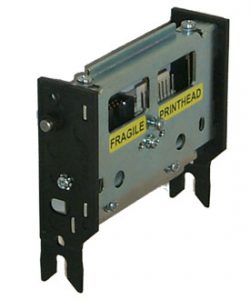
We often receive calls from clients whose printed ID cards include a fine white line. This line always appears in the same place on the card and does not vary (though one may not notice it if there is not a text, image, or background color in that area). This symptom indicates one of 3 problems with the printer’s printhead:

  1. A piece of dust, dirt or debris is stuck to the printhead;
  2. The printhead has physical damage (such as a scratch or a nick);
  3. The printhead has had one or more imaging pixels burn-out. This usually results from an electrical surge or lighting strike.

printhead

Solutions

A user can solve the first problem by manually cleaning the printhead with IPA alcohol wipes or swabs. (Find them here!)

The latter 2 problems are more common and require replacement of the printhead. Prior to purchasing a replacement, first check with your authorized dealer to see if the printhead is still under warranty. Virtually all top printer manufacturers’ warranties offer to replace a damaged printhead for a defined period of time following purchase of a new printer.

A word of caution: Please review your own printer’s warranty for any coverage requirements or restrictions. Many of these warranties require performing required cleanings on-schedule (usually about every 1,000 cards, but check your printer’s user manual for the exact number). Additionally, many warranties exclude damage caused by misuse, or use of sub-standard materials (i.e., cheap cards or non-brand ribbons).

For more support, or information about quality ID-card printers, parts and supplies, visit our web store, or contact one of our ID experts at +1 704.535.5200 or toll-free at +1 888.485.4696 (US & Canada).

Fargo Printer – Wrong Ribbon Error

We often receive calls from clients whose Fargo ID card printers display a “wrong ribbon” error. This error will appear on the printer’s LCD screen or on the user’s computer monitor and has a few potential causes.HID Fargo Printers - wrong ribbon error

Common Causes of the “Wrong Ribbon” Error:

Hardware Fault

Occasionally, we find that there is a hardware fault with the printer, particularly with the ribbon sensor or RFID-tag reader. After ruling out the other possible problems listed below, please call one of our experts if you still receive the “wrong ribbon” error.

Wrong Ribbon

You could, indeed, have the wrong ribbon for the printer. Many Fargo ribbon cartridges look identical, and there are no markings on the ribbon carriers to indicate which you have. For example, a YMCKO ribbon for the Fargo DTC1250e looks like the YMCKO ribbon for the DTC4250e, but they are not interchangeable. Each ribbon has an embedded RFID tag which includes a ribbon part-number. The printer’s corresponding firmware includes a list of all ribbons that are compatible with the printer. As a result, if your ribbon is not compatible with your printer, you will receive this message.

Bad Ribbon RFID Tag

Fargo ID-card printer ribbons are manufactured to include an RFID tag, which contains information about the ribbon itself (ribbon type, lot number, manufacturing site, etc.). On VERY rare occasions, this RFID tag is missing, or the data has been corrupted. This will prevent the printer from recognizing an otherwise good ribbon as valid. Try another ribbon if you have one available.

Out-of-Date Firmware

You could have out-of-date firmware on your printer. Periodically, Fargo will introduce new firmware to include updated manufacturing information. Once this new firmware is introduced, they will include new data on the encoded RFID tag affixed to the ribbon cartridge.  A printer with outdated firmware will be unable to validate ribbons that have this new encoding and reject them, returning a “wrong ribbon” error. Please see our separate blog post “Fargo Printers How-to: Update your Drivers and Firmware” for detailed instructions on updating firmware.

Incorrect Driver Setting

But most-likely, the error is the result of an incorrect print-driver setting. For example, you may have a full-color (YMCKO) ribbon, but a print driver set for a monochrome-black (K) ribbon. This mismatch between the actual ribbon loaded, and the ribbon the PC “thinks” should be loaded will result in a mismatch, and “wrong ribbon” error. For this scenario, follow the directions below to change the printer driver settings.

Choosing the Correct Driver Setting

Prior to beginning the instructions below, please verify that you have Windows administrator rights or have been granted Windows permissions by  your network administrator to change the driver functions on your computer. Without these elevated privileges, you will not be able to make these changes.

  1. Click the Windows “Start” icon (usually the lower-left corner of your screen);
  2. Select “Devices and Printers” (if not visible, enter this as a term in the search box);
  3. Locate your Fargo printer and right-click on it;
  4. Select and click on “Printing preferences” – a new window will open;
  5. Select the “Device Options” tab, then use the drop-down box to select your ribbon type;
  6. Click the “Apply” button in the lower-right, and then click “OK” to finish and close the Window.

Need more info?

Fargo ID-card printers are manufactured by HID Global. For information about Fargo printers, contact us for a free consultation toll-free at +1 888.485.4696 (US & Canada), or +1 704.535.5200 (elsewhere).

Evolis Primacy – How to Do a Routine Printer Cleaning

The following video provided by Evolis provides manufacturer instructions illustrating how to complete a routine printer cleaning with a cleaning card.

1. Open the printer lid on the top of the printer.
2. Remove the print ribbon.
3. Close the lid.
4. Open the card input hopper.
5. Remove all blank cards.
6. Shift the card thickness gauge to “MAX”.
7. Remove the adhesive strip from the cleaning card.
8. Place the cleaning card in the input hopper and leave the hopper door open.
9. Press the power button twice.
10. The card will be automatically cycled through the printer and ejected into the output hopper.
11. Remove the card from the output hopper and close the card output hopper.
12. Open the printer lid.
13. Replace the print ribbon and close the lid.
14. Return unused cards to the input hopper.
15. Return the thickness gauge to its correct setting and close the hopper door.

For information about the Evolis Primacy printer, please contact our ID card experts at +1 888.485.4696.

Fargo HDP5000 – Ribbon Has Miscued Error

When using a Fargo HDP5000 printer, the error code “ribbon hasThe Fargo HDP5000 sometimes returns a "ribbon has miscued" error miscued” may display on the LCD screen. The printer may also display an Error Code 97. The following are the steps you can take to attempt to resolve the error and resume printing.
  1. Open Windows’ “Devices and Printers” screen;
  2. Locate the HDP5000 printer, and right-click on it with your mouse;
  3. Select the option for “Printing Preferences”;
  4. Select the tab named “Card”;
  5. Click the link button for “ToolBox” and a new window will open;
  6. In the new window, select the “Calibrate Ribbon” tab, and follow the directions provided.

If the calibration finishes normally, resume printing your cards. If the calibration does not resolve the problem, or the same errors continue to occur, please contact us about your warranty or service options, as this error is also symptomatic of a ribbon sensor that has gone bad.

For a complete list of error codes for the HDP5000, access the User Guide provided by HID Global. A list of the codes that appear on the LCD screen begins on page 65 of the PDF.

Visit our website or web store for information about the Fargo HDP5000 and other Fargo printers. For further technical support, contact us for a free consultation at +1 888.485.4696 (US & Canada), or +1 704.535.5200.

Uh-Oh! Ribbon Not Recognized on Your Trusty Fargo Printer?

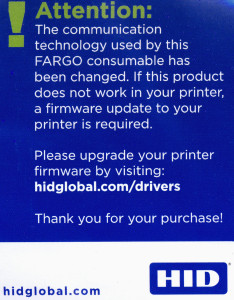
HID_Fargo_Ribbon_Insert2

Ribbon insert provided by HID, indicated the need for a firmware update.

Hopefully, many of you are staying on top of your firmware updates. If you aren’t and have a Fargo printer, today is the day to catch up. HID Fargo has updated the RFID chip in their 442xx print ribbons. As you may know, the RFID chip ensures that you have genuine HID/Fargo ribbons, which assures warranty coverage and proper functioning, plus enables automatic ribbon sensing and settings for those who may switch ribbons periodically. As a result of this change, if you have a Persona C30 or PersonaC30e, you may find that your printer does not immediately recognize your new 442xx ribbon, making the printer unusable until the proper device firmware is loaded.

If this is the case, you simply need to update your printer’s firmware. (If you like to get ahead of potential pitfalls, this is also a great process to undergo–it will help you stay on top of important updates in the future!) This can be done by using the Fargo Workbench Utility to download and install any new firmware, as well as any driver updates. These steps will help you make this update smoothly:

  • If it is not already loaded on your PC, download and install the Fargo Workbench Utility from the HID/Fargo website here: https://www.hidglobal.com/drivers/15325;
  • Ensure your Fargo printer is connected and powered on, and that you have a “live” internet connection, then start/run Fargo Workbench
  • In the upper-right of the application screen is a drop-down box where you can select the Fargo printer you wish to work with (if you have only one, it should be pre-selected);
  • Click on the “Update Manager” icon in the upper-left of your screen;
  • Click the link to “Check for Updates” just under the Update Manager icon. Workbench will automatically connect to the HID/Fargo servers, and report any needed updates to either the printer drivers or the firmware.
  • If any updates are found, click the appropriate button to first “Download”, then to “Apply” the discovered updates. If both driver and firmware updates are available, we recommend applying the driver update(s) first, and then the firmware update.
  • If no updates are available, then congratulate yourself for avoiding trouble before it found you!

If you have already installed the most recent firmware and your printer still does not recognize your ribbon, or if you have trouble with any of the above, please call one of our experts at +1 704.535.5200 or +1 888.485.4696 (US & Canada). We’re happy to help!

New Linux Drivers for Evolis Printers

Linux Penguin

Evolis released new Linux drivers in December 2014 for the Zenius, Primacy, Quantum 1 & 2, Dualys 1/2/3, Tattoo 1 & 2, Pebble 2/3/4, and Securion printers. These drivers are now available with RPB or DEB installation packages for the 64 and 32 bit versions.

The new drivers for all of the printers listed above (as well as drivers for other operating systems) can be downloaded here. As a reminder, we recommend keeping your drivers up-to-date (and that you update your firmware at the same time!) to ensure that your printer operates at maximum efficiency.

As always, our experts are ready to help with any problems or questions and can be reached at +1-704-535-5200 or +1-888-485-4696.

TrustID Software, New from UltraID

UltraID (parent company of Magicard) has released new badging software, TrustID.

The software features drag-and-drop design, is compatible with any plastic card printer, and allows you to capture images from any camera right in the program. It comes in 3 tiers, each of which is available for a 30-day trial. If you’re in the market for a new badging software, give it a whirl. And let us know what you think!

TrustID Classic TrustID Professional TrustID Pro Smart
Drag-and-Drop card builder Conditional elements & layers Smart card encoding
Pre-defined template Multi-card layout + Everything in the Professional Edition
Single card design Integrated reporting
1D and 2D barcodes with 60+ integrated barcode formats User account management
Integrated database editor Password protection
Add custom & composite database fields Unlimited Record Internal Database
Integrated image capture + Everything in the Classic Edition
Import CSV and text database files
Print to any plastic card printer
Label templates and printer support
Live preview
Double-sided printing
Batch printing
Maximum 200 Record Internal Database
Magnetic stripe encoding

As always, call our experts at +1-704-535-5200 with any questions about pricing information (or anything else!) or concerns!