Author Archives: Safe-Card ID Team

Fargo HDP5000 Has New Mac Computer Compatibility

Fargo HDP5000

Fargo HDP5000 Printer Update

Fargo is making improvements to their quality ID card printer models.

The Fargo HDP500 is now able to be used by those operating a Mac computer. Recently the enhancement to provide compatibility with the Mac OS X v10.4 and v10.5 drivers became available.

download Download the Fargo developed driver at Fargo support.

For more information about Fargo printers or the Fargo HDP5000, contact our ID experts at 888-485-4696.

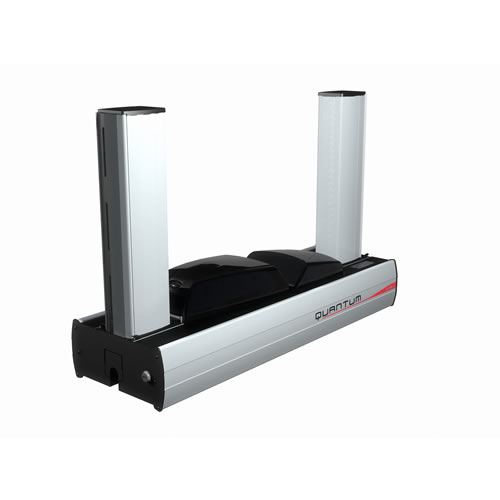
Evolis Quantum – Enhanced Printer Now Available

Evolis Quantum Printer Is Now Available

Evolis Quantum

The all new Quantum has the power of a centralized printer system with the flexibility of a desktop printer.

The newest version of the Quantum, the printer to personalize cards in large quantities, is now available. Cards encoded and printed in high volume may include:

  • ID cards
  • Loyalty cards
  • Event passes
  • Student IDs
  • Transport cards
  • Calling cards
  • Banking cards

Known for it’s speed, the Evolis Quantum prints 1000+ cards per hour in monochrome and 135 cards per hour in full color. The printer can include mixing and matching texts, pictures, bar codes, and logos in this speed quarantee. To assist in this output, the printer includes 2 brand-new detachable and interchangeable high-capacity hoppers that store up to 500 cards. Cards can be preloaded in the hoppers and if additional hoppers are needed, they are available.

The printer has a reversible encoding unit that allows versatility to print and encode the same side of a plastic card without flipping the card over. The same printer can print magnetic, smart contact and smart contactless encoded cards.

Here are the main printer specifications:

* Dual-sided printing
* Color and monochrome printing
* Printing throughput: 1000+ cards per hour in monochrome, 125+ cards per hour in color – full card surface
* Encoding of magnetic stripes, contact and contactless smart cards
* Supports Windows Vista and XP. MAC driver is available upon request

For additional information about the Evolis Quantum or other Evolis card printers, contact our ID card experts at 888-485-4696.

Zebra P330i – Using the Single Card Feeder


To set up the Zebra P330i printer for feeding single cards, follow the steps listed in the video.

First, the driver setting must be changed.
1. Empty the card feeder by removing the cards.

2. Use the eject command to remove the remaining id card in the printer.

a. Open the printer properties menu.
b. Select the device settings tab.
c. Go to the tools menu.
d. There are two eject card buttons to select from:

i. A button to eject the cards from the print engine.
ii. A button to eject the cards from the feeder and the print engine.

Second, insert the card into the slot under the feeder lid on the right side of the printer.

Third, the card will automatically be drawn into the printer with the print job is sent.

Find out specific information about Zebra Printer models:

Zebra P110i
Zebra P330i
Zebra P430i

For other Zebra printing tips see the following videos:

Zebra P330i – ID Card Printing Tips

Zebra P330i – Installing A Print Ribbon

Zebra P330i – Loading PVC Cards

Zebra P330i – Installing Printer Drivers

Zebra P330i – Installation Tips

Asure ID 2009 Software – Using SQL as the Native Database

Setting up Asure 2009 to use SQL as the Native database:

The first thing that needs to be done is have the SQL Database Administrator create a database instance for Asure 2009 to use. The security setting for the database needs to be set by the SQL Database Administrator. They need to grant full read/write privileges to the database instance.

On that instance the SQL Database Administrator needs to run the table creation script. The script can be found at the location shown in the following screen shot:
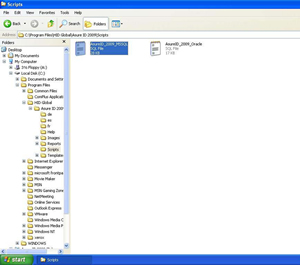
Once the script has been run to create the tables Asure 2009 can now be connected to the database. Under the start menu, choose the “Data Connection Wizard” as shown below:
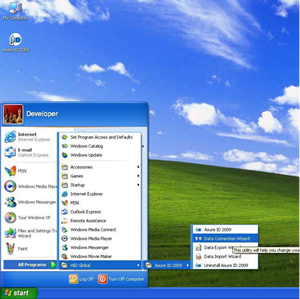
This will start the wizard to connect Asure 2009 to the SQL Database.

Below is the first screen for the wizard:
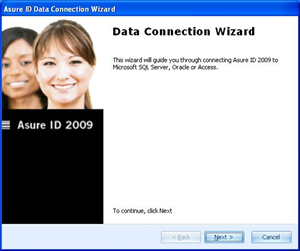
Click next to continue setting up the customer database configuration for Asure 2009.

The next screenshot is the wizard asking what type of custom database Asure 2009 will be connected to:
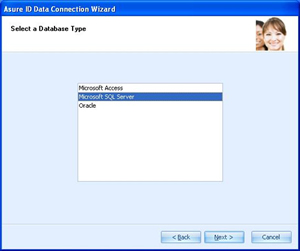
In this example choose “Microsoft SQL Server” and click “Next”.

The following screen shot is the actual set up screen of the wizard. This is the general data connect window for SQL Server:
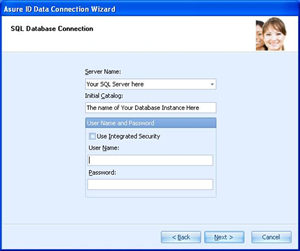
Under “Server Name” the name of the SQL Server needs to be entered. Then under “Initial Catalog” type in the name of the Database Instance that the SQL Database Administrator set up for Asure 2009 to use. The “User Name and Password” should be provided to you by your SQL Database Admin. These can either be specified user names and passwords or it can be set up to “Use Integrated Security”. This means that who ever logged on to the computer has access to the database.

Once it is all filled out, click “Next”.

The wizard is now complete.
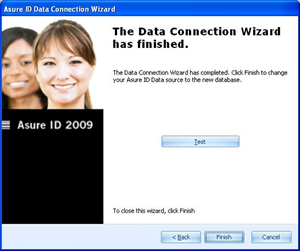
You can click the “Test” button to test the connection to the SQL Database.

Once you have verified the connection click “OK”.

The following screen will be back up again:
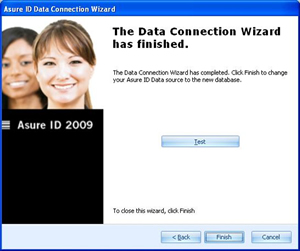
Click “Finish” to exit the wizard.
The log in for Asure 2009 now that it is connected to the SQL Database is:
User Name: admin
Password: admin

Safe-Card ID provides ID card printers and ID card software including Asure ID Software. Contact our ID card experts at 888-485-4696 for purchasing information.
Bar Codes Not Working when Scanned

Question to our Technical Support Staff:

My bar code will not read when placing the card on/in the scanner.

Techncial Response:

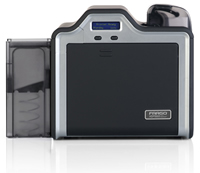
One of the reasons that the bar code will not read may be that the printer driver settings are incorrect in the id card printer that is printing on the PVC card. The id card printer may be set to print a process called a “composite card.” This process is incorrect as the bar code needs to be printed by a true resin black process.

If you think your id card printer is not printing in true resin black. Follow the procedures below to check and/or correct your printer settings.

    1. Pull out the print ribbon from your printer after you have printed a card containing a bar code.
    2. Look at each panel of the ribbon that has printed the card containing the bar code.
    3. If you see places in each of the various ribbon panels that look like the bar code, the printer has built the bar code by using color panels. This is the composite printing and the bar code will not work correctly in most instances.
    4. To change the printer settings to require the bar code print in resin black, go to the K-resin tab in your print driver.
    5. Set the tab to print K-resin black for the bar code.
    6. Apply the settings.
    7. Rerun the print job. This should solve the bar code problem.

For specific information about Fargo printers and the capabilities of current ID card printer systems, contact our ID card experts toll free at 888-485-4696.

Evolis Printer – Install an Ethernet Printer on Mac 10.4 and 10.5

Following are the steps to install the driver on a Mac 10.4 or 10.5:

1. Prior to starting the installation, plug in the printer to the Mac and make sure that you have Administrator rights.

2. Go to the Evolis website at www.evolis.com. Download the necessary driver and follow the instructions during your installation.

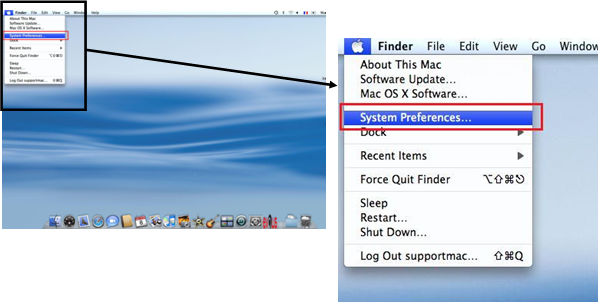
3. Open the System Preferences.
Mac Installation

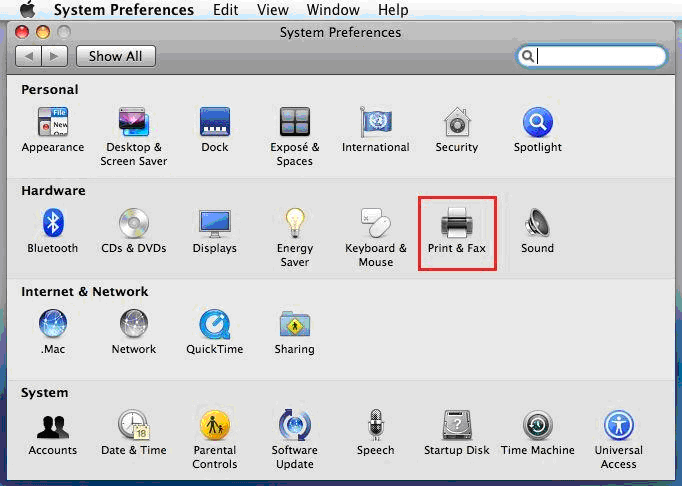
Then open the printers and faxes.
Mac Installation

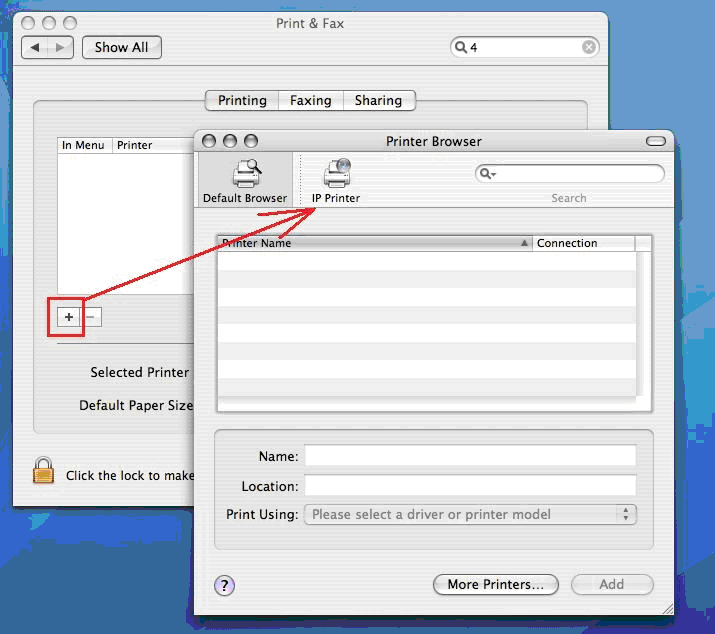
4. Click on the + to add and then click on the IP PRINTER button printer which should be already detected.
Mac Installation

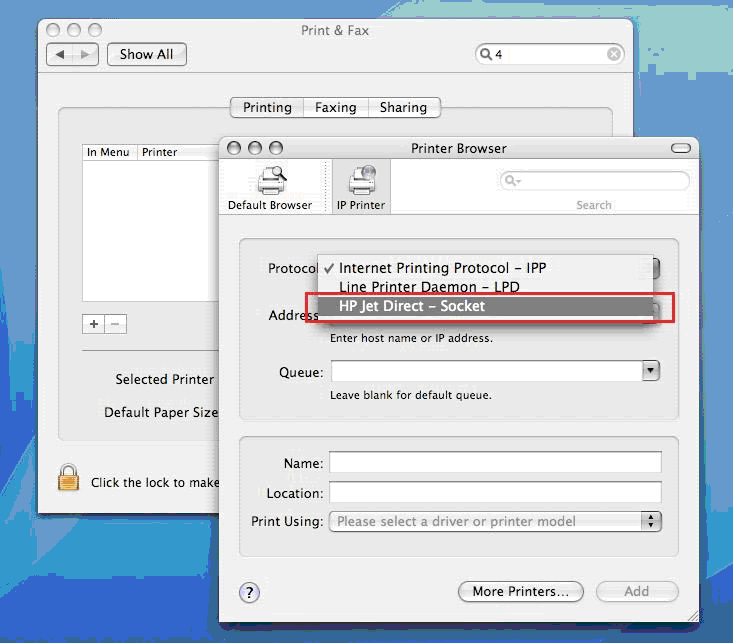
5. Choose the HP Jet Direct Socket option in the Printer Broswer section, choose Select a driver.
Mac Installation

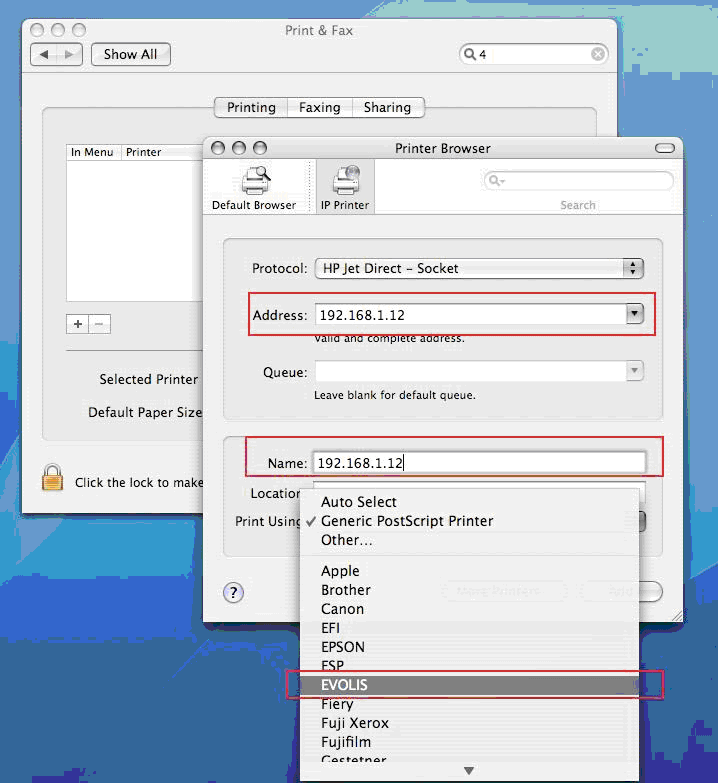
6. Enter the printer’s IP address and select EVOLIS in the Print Using section.
Mac Installation

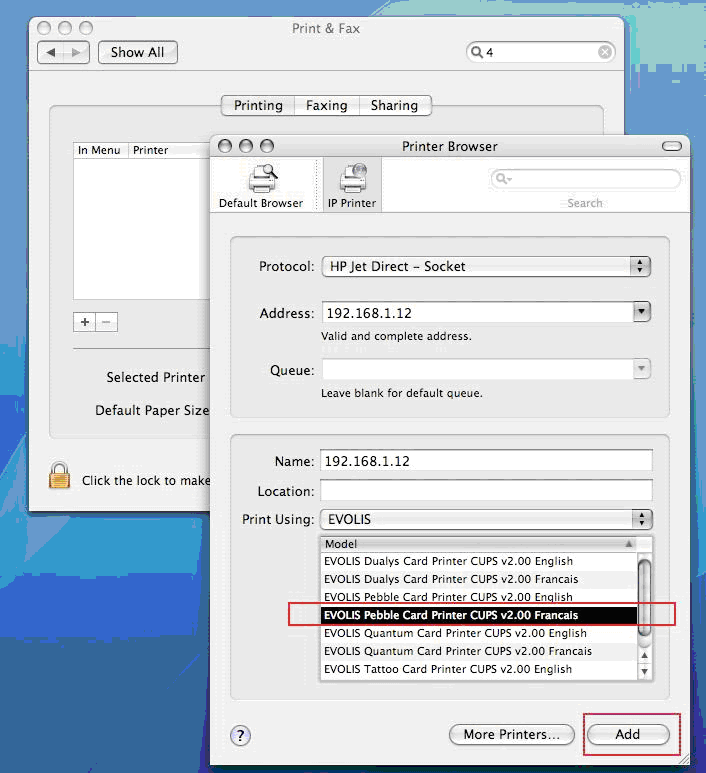
7. Choose in the menu list the Evolis driver and the language you need. Click on Add to validate your choice.
Mac Installation

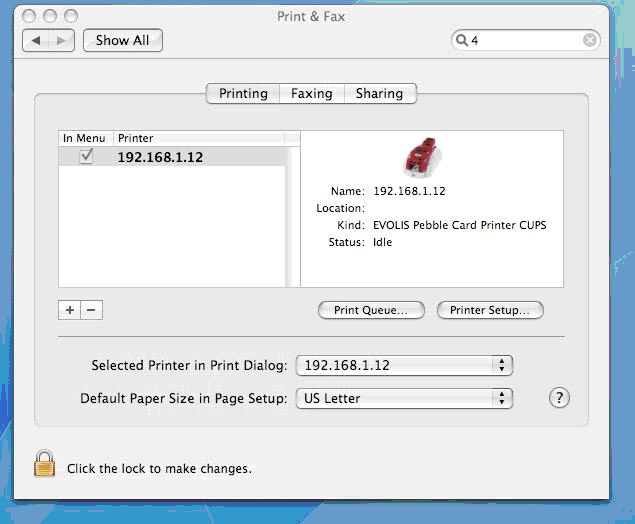
8. The driver in now ready to be used.
Mac Installation

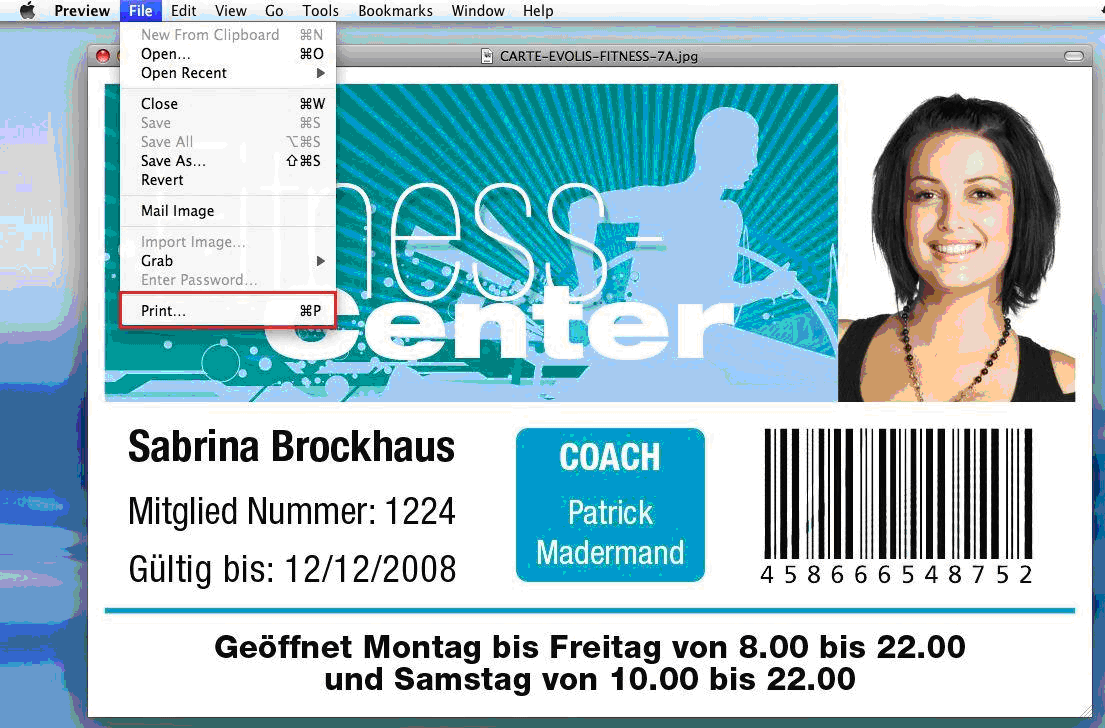
9. To print your design, open your card printing software. Click on file and print to access the printing properties.
Mac Installation

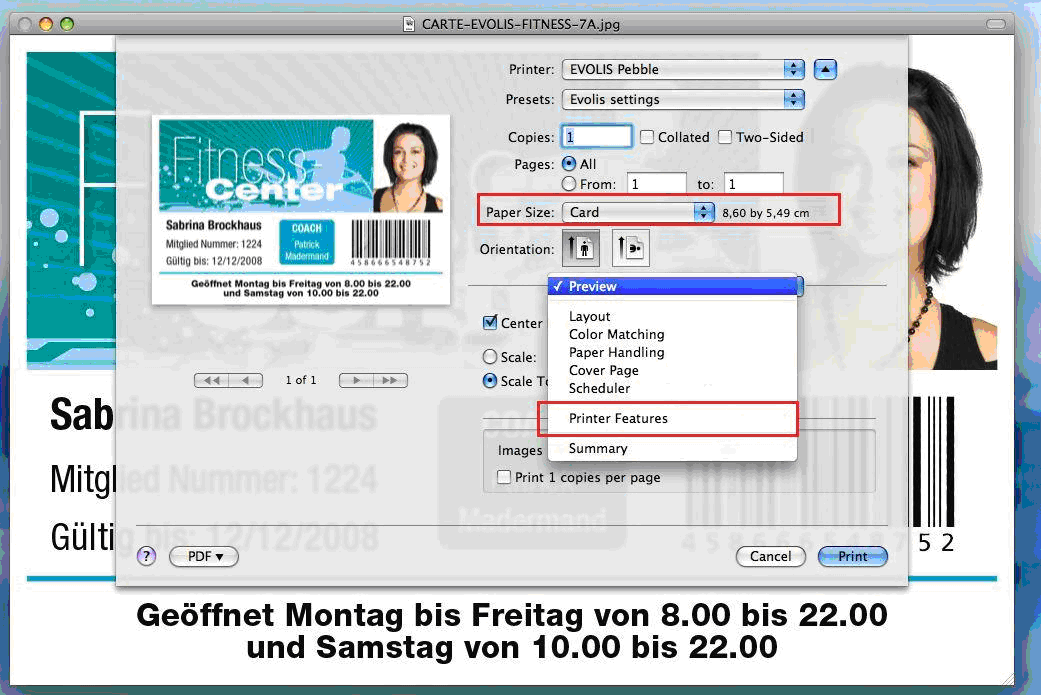
10. Make sure the correct driver has been selected for the printer and check the paper size in Card. Go to the printer features to access the Evolis driver properties if you need to communicate with the printer.
Mac Installation

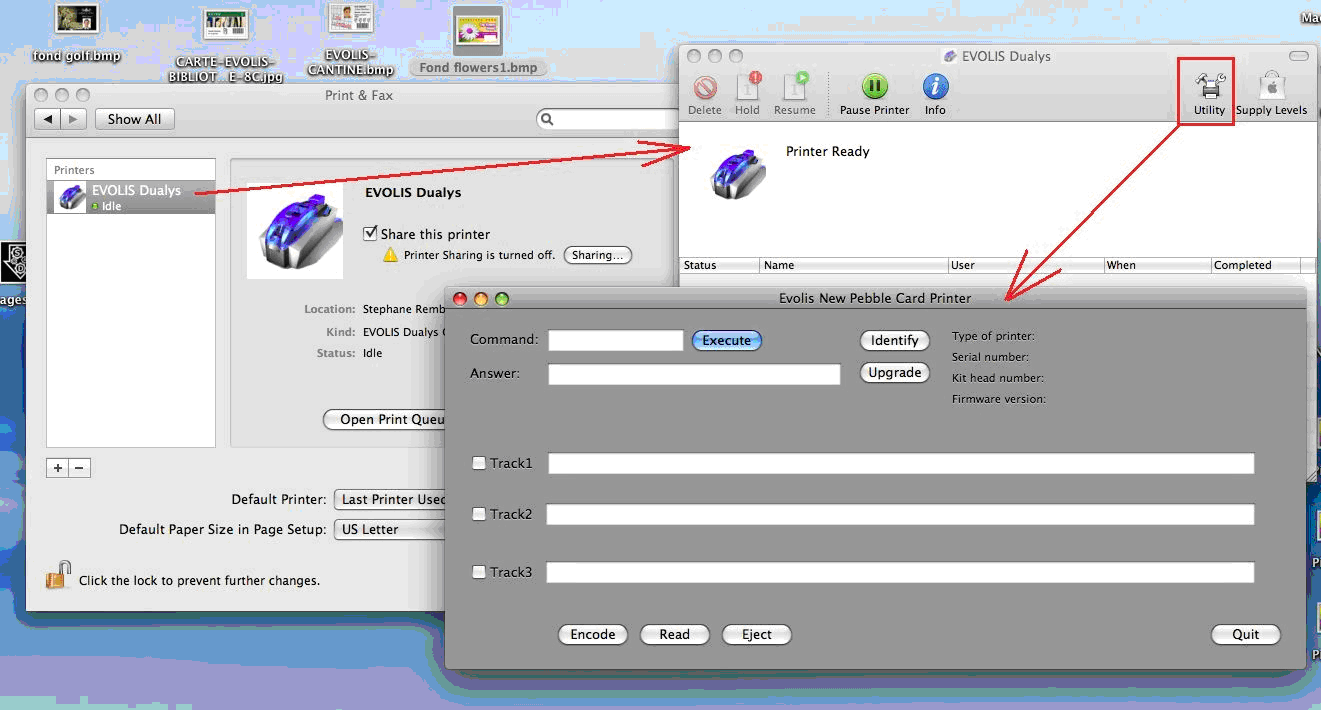
11. Open the driver spooler from the Print and Fax section and click on Utility
Mac Installation

For more information about Evolis printers, search our blog about Evolis printer support or call our ID experts at 888-485.4696.

Fargo Printer – Cleaning the ID Card Printer

Fargo HDP5000

It is important to keep the Fargo card printer clean to provide professional quality ID card printing for years to come. When cleaning the printer, follow the steps below to ensure the printer is cleaned correctly.

CLEANING THE PRINTHEAD

1. Open the printer front cover.
2. Remove the print ribbon.
3. Squeeze the printhead cleaning swab to saturate the tip of the swab with alcohol.
4. Rub the swab gently back and forth over the length of the printhead.
5. When the printhead is completely dry, replace the ribbon and close the front cover.

CLEANING THE PLATEN AND CARD FEED ROLLERS

1. Open the printer front cover and remove the print ribbon.
2. Remove the cards from the printer’s input hopper.
3. Use the cleaning card from the cleaning kit and remove the adhesive backing from both sides of the card.
4. Insert the cleaning card into the single feed card slot until the card stops.
5. From your computer, open the printer driver and select “printing preferences.”
6. Click on the “clean printer” button.
7. Click on the “clean” button.

At this point, the printer will pull in the cleaning card. The printer will perform an automated cleaning.

Cleaning the Printer’s Interior

Occasionally, use a cleaning pad from your cleaning kit to remove dust and dirt from inside the printer.

Cleaning the Printer’s Exterior

Use a cleaning pad from the cleaning kit to remove dirt from the outside of the printer.

For information about the Fargo HDP5000 printers or other Fargo printers, contact us for a free consultation at 888-485-4696.

Evolis Pebble – Setting the Correct Ribbon Settings

Evolis Pebble 4

The majority of people who print ID badges set the system up for the single badge design and are good to go. Other groups have various cards designs for various applications. Some of these cards may be full color and other cards may be single color. To save on costs, the single color cards can be printed using a single color ribbon and a ribbon change is made when switching from the single color to a multi color card.

If your cards are not printing correctly after switching out the ribbon, follow the following steps on your PC to adjust the printer and software to the new ribbon selection.

    • 1. Go to your computer start button.
      2. Select printers and faxes
      3. Select the Evolis Pebble and right click.
      4. Select printing preferences.
      5. On the graphic tab, the first selecton is “ribbon”. Select the correct ribbon for your new printing job. Click “Set Ribbon.” Click “Ok.”

When you open your ID card software, check the printer settings. Make sure that your ribbon selection is the same as the one you set in the printer driver.

For information about ID card printers or specific Evolis printers, contact us for a free consultation at 888-485-4696.

Evolis Dualys Printer – The Card Prints Black

When printing with an Evolis Dualys3 ID-card printer, and the card prints solid black, you likely have an improper print-driver setting. This problem most often occurs when printing dual-sided cards, where you intend the front-side to be full-color, with the back-side monochrome-black.

Evolis Dualys3 - Card Prints Black

The Cause of Card Prints Black Issues:

There doesn’t seem to be a definitive cause, but there is a high correlation with updates and upgrades to Windows, and onset of the problem. We believe that these updates and upgrades result in the Dualys3 printer driver being reset to its defaults. In particular, the “ribbon-type” parameter gets reset to assume use of a R3011 print-ribbon, rather that the R3314 ribbon.

The Fix for Card Prints Black Issues:

Prior to beginning the instructions below, please verify that you are logged into Windows with a user-ID that has administrative privileges. Alternately, ensure your ID has been granted elevated privileges sufficient to allow updating printer drivers. If you do not have the required privileges, contact your IT-support provider for assistance.

Step-by-step:

  1. If open, close the application you are using to print cards.
  2. Locate the Windows “Start” button (generally, in the lower-left corner of your screen).
  3. Access the device-driver settings screen, as follows:
    1. Windows 8.1 & Windows 10: Right-click the Windows icon, and select “Settings”, then “Control Panel”, then “Devices and Printers”.
    2. Windows 7: Left-click the Windows icon, and select “Devices and Printers” from the right-side menu. If that choice is not available, select “Control Panel”, then “Devices and Printers”. Note that, if accessing via Control Panel, you may need to switch the Control Panel default view from “Categories” to “Small Icons”, in the upper right of the screen.
    3. Windows XP: Left-click the Windows “Start” button, and select “Printers and Faxes” from the right-side menu. If that choice is not available, select “Control Panel”, then “Printers and Faxes”.
  4. In resultant window, locate the Evolis Dualys3 within the list of printers.
  5. Right-click on the printer then with a left-click, select “Printing preferences”. This will open the device-driver settings window.
  6. Ensure that the “Graphics” tab is selected then change the ribbon setting from “R3011 – 5-panel colour ribbon YMCKO” to ribbon type “R3314 – 6-panel colour ribbon – YMCKOK”.
  7. Single-click on the “Apply” button, then the “OK” button to save the setting change.
  8. Close the device view window, and the Control Panel window (if opened).
  9. Cycle the power on the Dualys3 either with the power button, or by unplugging for 5 seconds, and then plugging in again.
  10. Re-open your card-printing application and resume printing.

Following the above procedure should restore normal printing function for your Evolis Dualys3 printer.

Need more info?

Safe-Card ID Services is an authorized dealer and service provider for the full line of Evolis productions. For further information on or assistance with your Evolis printer, give our ID-card experts a call toll-free at +1 888.485.4696 (US & Canada) or +1 704.535.5200 (elsewhere).

Visitor Management Software

Visitor Management Software – Lobby Track

For excellent visitor and member management software, look no further than Lobby Track 4. The software registers visitors and members. The software will issue permanent and temporary badges as well as track time and attendance. Various activities can be monitored through this software.

SCREEN SHOTS

For detailed information about Lobby Track Software, you can view screen shots from the software on our site.

DEMO VIDEOS

View Demos of the Lobby Track Software

A FREE TRIAL VERSION AVAILABLE

Download a free trial version of the Lobby Track Software

For additional information about visitor id management systems or photo id card printer systems, contact our id card experts at 888-485-4696.